Saturday, December 15, 2007

More Roasted Veggies! This time, with couscous

Over at $40 A Week, a challenge was issued. Not being a faint-of-heart type, and being instead an "I have a problem in my over-stocked panty" type, I jumped on it. They want us to clean out our pantries - use the "just in case" supplies that are lurking. And in the process, we get to weed out the stuff we'll never use and give them to a food pantry.

So my box of food to give away is full of cups of ramen noodles, cans of vienna sausages and potted meat and other assorted things that have been lurking in the depths of my pantry for too long. Now? I have some extra shelf space that I get to fill up with things that I might - just might - actually use.


And I came up with three ingredients that I wanted to use in a meal:
Wild mushroom and herb couscous mix
black olives
canned salmon


I used up the bell pepper and onions in my fridge, threw in some tomatoes and a dish was born. I made some salmon patties out of the can of salmon - something I haven't done in years. Simple, but so good!


And once again, I found myself wanting to just pick the roasted vegetables off of the pan. I think I may have a new addiction.


I ended up only using a couple of things out of my pantry, but the recipe was created in the spirit of the thing. Which counts. I hope.


Roasted Veggie Couscous:

1 pint grape tomatoes, cut in halves
1/2 yellow bell pepper, cut in strips
1/2 orange bell pepper, cut in strips
1/2 red onion, cut in strips
1 tbsp olive oil
1 tsp minced garlic
black pepper, to taste
1 box Near East wild mushroom and herb couscous mix
1 can medium black olives, sliced
1/2 cup shredded smoked Gouda

Toss tomatoes, peppers, onion and garlic in olive oil and pepper. Spread on a baking sheet and cook at 350F for 30 minutes.

Prepare couscous.

Spread couscous in shallow casserole. Sprinkle the sliced olives on top, and then the roasted vegetables. Sprinkle the cheese over the whole she-bang, and broil for about 5 minutes or until the cheese is as melted and broiled as you like it.

Salmon Patties:

1 14 1/2 oz can of salmon
1/2 cup saltine cracker crumbs
1 egg
salt and pepper
1/2 tsp ground thyme
oil

In a medium mixing bowl, combine all the ingredients. Form into 3 inch patties and cook in oil, about 2-3 minutes per side. Serve with lemon juice.

Thursday, December 13, 2007

Shiny Happy Toys, or How Amazon Stole My Budget

Last week, Amazon was a having four-for-three sale. They might still be having it, for that matter, but I'm afraid to go look. I'm afraid because in one moment of weakness, I ordered 2 new cookie sheets, a new muffin pan and a gratin dish that is the prettiest shade of blue EVER - which I'm afraid to actually put food in it, because then I will have to wash it and that might destroy the pretty blueness.

Have a mentioned my need for therapy lately? Donations gladly accepted.

Anyway, thanks to Amazon's Awesome-ness, here is what I got free with the above items:

  • A micro plane grater (Yes, I caved and did the Amazon blow-out the day after I grated the oranges without one of these. My bank account can blame my oranges for having a smaller balance).
  • A subscription to my choice of Bon Apetit or Gourmet. I'm leaning towards Bon Apetit, but I haven't made my final decision - anyone out there with an opinion, informed or otherwise -tell me what you think.
  • Free shipping on everything!
So, see…I got so much free stuff that it totally outweighs the money that I spent. In fact, I think I saved more money than I spent! It's like everything was free!

I also think I'm channelling my godmother. God bless her for getting her hands on me while I was young.

I'm off to grate some clementines. Before I cave and go back to Amazon and notice the 70% off sale they have going on in the Kitchen.& Home section.

Tuesday, December 11, 2007

Roasted Acorn Squash Pasta

I learned something last night: Peeling raw acorn squash is not a job that I EVER want to do again. At the moment, I'm willing to accept that I did something wrong. I don't admit this often, so enjoy it while you can.

I cut the squash in half, scooped out the insides, and then sliced it along it's dips (as opposed to its ridges). The problem with acorn squash is that while it is quite possibly one of the cutest and most adorable looking of the squashes, it's a royal pain in the backside to get the peel off of the good stuff when it's not cooked. As I was almost finished getting the blasted peel off of the blasted squash, I realized my melon baller would probably have handled it a lot more gracefully than me and my knife.

Why do my moments of genius always come 10 minutes too late?


Roasted Acorn Squash Pasta


  • 1 small acorn squash, peel removed (in whatever manner you prefer) and cut into 1 inch pieces

  • 1 medium yellow onion, sliced

  • 1 yellow bell pepper, sliced

  • 2 small green bell peppers (or 1 large), sliced

  • 1 Tbsp olive oil

  • Salt and pepper to taste

  • 2 tsp dried rubbed sage

  • 6 oz pasta (penne, bow tie, etc)

  • 1 can diced tomatoes

  • ½ cup shredded smoked Gouda

  • ¼ cup shredded Parmesan
Preheat oven to 450F.

Toss squash, onion and bell peppers in olive oil, sage, salt and pepper. Put on a cookie sheet and bake until everything is getting a beautiful deep golden color, about 20 minutes, stirring half way through.

While the veggies are roasting, cook your pasta to what ever degree of al-dente-ness you prefer.

Toss the veggies, pasta, tomatoes and Gouda together (making sure to leave the most carmelized pieces of onion sticking to the pan, so that when you serve yourself, you can be sure to add them to your bowl. Hey! Cooks get certain privelages).

Serve with Parmesan sprinkled on top.

Notes: It's Presto Pasta Night again! I am loving this excuse to cook pasta once a week!

Oh my oh my oh my did I love the taste of the acorn squash. I usually either cook it with brown sugar to bring out the sweetness or make a "stuffed" squash. But roasting it made it buttery and good. I could have eaten the squash all by itself. It would make a great side dish. Or a main course ALL for me.

I also cooked up about a pound and a half of chicken breasts, cubed them and threw them in to satisfy the The Professor's carnivorous habbits.

I had originally planned to bake this after I mxed everything together, but the veggies and the pasta were hot enough to warm the tomatoes and melt the cheese. And I was starving.

Sunday, December 9, 2007

Gnocchi, Vodka Sauce and Flour All OVER My Kitchen

Ever since I fried up the last of my in-laws gnocchi a few weeks ago, I’ve been wanting to make it on my own. I knew this was dangerous territory, because The Professor worships at the shrine of his parents’ gnocchi. But my father-in-law had written down the very simple recipe for me (only 3 ingredients!) and given me a step-by-step tutorial. So I figured I could probably follow it.

And in The Professor’s World (which sounds like a really bad name for a XXX rated spin-off to Gilligan’s Island), gnocchi MUST be served with vodka sauce. Which I had not gotten the sacrosanct recipe for. Dammit! I needed someone that I knew would love my attempt, even though it might not taste exactly the same as every other time she’s ever eaten it before in her life. Change is HEALTHY, Professor!
Ahem.
As this was obviously a job for The Bestest Friend EVER, I told her that her presence was requested for dinner. Even if the sauce tastes just a wee bit different, she loves whatever I put in her mouth. Which makes her sound like she’d have a recurring role on The Professor’s World and that’s just disturbing, so we’re going to move on to discussing the recipes, mmmkay?

Gnocchi Dough:
  • 16 oz ricotta
  • 1 egg
  • 2 cups all purpose flour

Vodka Sauce:

  • 1 tsp olive oil
  • 1 onion, diced
  • 1 tablespoon minced garlic
  • 1 can diced tomatoes
  • 1 cup vegetable stock
  • 1 tsp dried basil
  • 1 tsp dried oregano ½ cup vodka
  • 1 ½ cups half and half
  • ½ cup grated parmesan


OK, first up: The Gnocchi. If you like to keep your kitchen pristine, you do not ever want to see me make this.

Mix all three ingredients together in a mixer until it forms a dough.
Form the dough into medium size balls and sprinkle with flour.
Sprinkle your work surface – in my case, the kitchen counter – with more flour.
Sprinkle your hands with yet more flour.

Roll a ball of dough in your hands between your palms so that it begins to lengthen into a log.
When the log is longer than your hands, lay it on the floured surface and continue rolling, moving your hands from the center to the edges of the roll. Keep rolling until the dough-log-thing is about an inch thick.
Cut the log into one-inch long pieces with a sharp knife.

Ok, here’s the tricky part. You can buy special little boards to help you form ridges; my in-laws have perfected a dimple-roll method that they can perform at lightening speeds. Whatever method you use, you’re basically making a way for the gnocchi to hold more sauce. So if you want, just poke the tip of your finger into the middle of each one.


Move the gnocchi onto a cookie sheet and put in the freezer for about 30 minutes, so that when you put them in the boiling water, they don’t coalesce into one big gnocchi ball that would defeat the purpose of all the rolling and dimpling you just did.

Continue with the rest of the dough until it’s all done.
While the gnocchi is freezing, start your sauce.

Heat olive oil in large skillet.
Add onions, and sauté until translucent.
Add garlic, stir and cook for 1 minute.
Add can of diced tomatoes and vegetable stock.
Simmer for 15 minutes.

Heat water for gnocchi in pot (add 2 tbsp oil, if you want)
Whenever the water starts boiling, add frozen gnocchi.

Add basil and oregano to sauce; simmer for 10 minutes.
Pulse sauce in food processor.
Put back in skillet, add vodka and simmer some more.
Stir in parmesan and half and half. Simmer simmer simmer.
Continue cooking and stirring occasionally for 5-10 minutes.


Gnocchi should be boiling and floating; scoop them out of the water with a spider or slotted spoon.

Serve sauce over gnocchi, sprinkle with a little grated Parmesan and devour.

Friday, December 7, 2007

Mango Orange Trifle

The Professor’s department Christmas party was last night. Free booze, free food, and high-falutin’ conversation (seriously, the discussion on the philosophies of Bertrand Russell versus Ludwig Wittgenstein made me long for another glass bottle of wine). The annual party is always an adventure. And, it always gives me a really good reason to pull out one of my favorite dishes: my trifle bowl.

I do not use this nearly enough, considering that even a disaster looks like an angelic creation in a trifle bowl. I think you could layer cat food and bat guano in these things and as long as you topped it off with some whipped cream, it would make your mouth water.

Public Service Announcement: I do not use bat guano in my kitchen. Also, I would never fight my cats for their food because they would hurt me badly.

Hmm. Maybe I shouldn't mention bat guano when I’m trying to convince you that I made something worth eating?

Maybe this will make you feel better:


Mango Orange Trifle

  • Sponge Cake or Angel Food Cake
  • 2 Oranges
  • 1 cup orange juice
  • ¼ cup mango rum
  • 3 ½ cups of sliced mango (I used frozen that I thawed overnight in my beautiful new fridge, but fresh would be even better)
  • 2 boxes instant cheesecake pudding
  • 1 pint heavy cream
  • 1 cup half and half


Procedure:

Step One: Make the sponge cake. I originally found a recipe online and made it. But it was a complete flop. There was nothing spongy about it. In desperation, I bought an Angel Food Cake to use instead.

Step Two: Make the creamy-goodness:
Grate the rind of 1 ½ oranges.
Whip the pudding mix and creams until thick and luscious. Fold in the orange zest.
Take a wee taste of the creamy-goodness to make sure it is both creamy and goodness-y enough.

Step 3: Begin assembling process

Drain the mangoes, if necessary.
If you’re a feisty sort, get the juice out of your oranges.

Cut the cakes into 2” pieces.

Mix enough orange juice with the fresh squeezed stuff to make 1 cup. Add the the mango rum and stir.

Layer half of the cake on the bottom of the trifle. Drizzle with the rum/juice concoction, but don’t over-saturate.
Spread half of the creamy goodness on top of the cake.
Arrange half of the mango on top of the cake.

Repeat with another layer of sponge cake, rum/juice, creamy goodness and mangoes.
Sprinkle the remaining orange zest on the top.

Notes:
I made the cake the night before and thawed the mangoes in the fridge over night, then whipped the cream and assembled the pieces about an hour before we left for the party.

The sponge cakes I made did NOT rise, which indicates to me that I need to do some research on proper-sponge-cake procedures.

This is not low fat. It is not low sugar. It is NOT low carb. Other than the mangoes, there is very little in it that is remotely healthy. And those are the precise reasons that I loved it.

Wednesday, December 5, 2007

Chicken Pasta with Creamy Brie Sauce

I've been drooling over Presto Pasta Nights for so long now. Every week I get my fix, and this week I dare to join in...

I tried something new for dinner last night. I love creamy cheesy pasta sauces (I also love herby-tomatoey sauces, and simple olive oil, and rivers of vodka sauce…but we’ll focus on one addiction at a time). And last night, I wanted something other than parmesan or romano melted into my clog-your-arteries butter and cream creation. If I’m going to kill myself with fat content, I might as well do it with varying tastes of high fat content. Right?


Chicken Pasta with Brie Cream Sauce

2 boneless, skinless chicken breasts
8 oz pasta (I used penne)
2 Tbsp butter
1 green bell pepper, sliced
3 cloves garlic, minced
1 tsp Red pepper flakes
2 tsp Thyme
2 tsp Oregano
1 Tbsp butter
1/2 cup chicken stock
1 cup half and half
4 oz brie, rind cut off, cut as small as possible and divided
1 cup Italian bread crumbs

Preheat oven to 350F.
Cook pasta, drain and move to a large bowl.

Cook chicken completely and cut into cubes.

Add bell pepper strips and garlic to butter in the skillet and sauté for 5 minutes so they are crisp-tender. Stir in the red pepper, thyme and oregano and cook for another minute. Add it and the cubed chicken to pasta, making to sure to scrape the pan.

Add 2 Tbsp butter and chicken stock to skillet and melt; add cream and stir constantly until it starts to thicken. Add half of the brie and continue stirring. When the brie is melted and the sauce starts to thicken, turn off the heat and stir for another minute.


Pour sauce over the vegetables and pasta, and toss until everything is…well tossed.

Pour in a 2 quart casserole and top with bread crumbs and then the remaining brie. Bake for about 20 minutes, until the top starts making your mouth drool with it’s golden goodness.

Notes:
Next time, all of the brie is going in the sauce. It didn't melt very well on top.I used the same skillet for everything , and I didn't wipe it out between any of the steps, so that I could be sure and get all of the stuff that stuck to the pan when it was time to make the sauce.

The Professor claimed that this was too spicy, but as we all know by now, he's kind of a pansy when it comes to spicy foods (I love you honey!). It does have a little heat, so if you don't like that kind of thing, cut the red pepper flakes in half.

Be smarter than I was: remember to cut the rind off the brie before you start cutting it into itty bitty pieces.

I’m wondering how this would taste with smoked Gouda…???

Tuesday, December 4, 2007

Shiny and New

I got a new toy yesterday!:


Look! Do you see the ice maker? An Ice Maker! I have finally entered the 21st century, my friends.


We put the old one in the garage. I am drooling over the fact that between the two, I have more than twice as much freezer room now. The stocks I will save! The meat I will buy on sale and freeze! The meals I can make ahead of time!

And oh, my goodness - the amount of ice I will now have for my beloved mango rum!

Monday, December 3, 2007

Venison Casseroles and Rice Balls

I hide it well, but I’m a lazy person. Which is why I have a blog about food and not interior decorating. Because if I had to post pictures of my house, you would be afraid to admit you had even seen the picture. It would taint your color-coordinated, matched-candlesticks soul forever.
{You wouldn’t know this, but that last paragraph wore me out so much, I took a 10 minutes power nap.)

So, when I made the lasagna last month and had about 2 pounds of venison left over, I decided to make a huge casserole for dinner, split most of it up into pans and freeze it. It sounds like I was thinking ahead. In reality, I was thinking of how much more time I would have to lie around on the couch and be lazy on my internets if I had three less dinners to plan in my life. I scrounged around my refrigerator and pantry and found various things to throw in a bowl and call “dinner”.

The frozen version:


The first time I thawed one out, I added some diced tomatoes and tons of basil and oregano; I topped it off with bread crumbs and parmesan cheese, and then baked it until the top was nice and golden. Alas, my laziness made me forget to take a picture.

Last week, I used the second one. After it thawed I added a couple of eggs and some bread crumbs, then formed it into balls and rolled it in more breadcrumbs and cooked them in a couple of inches of vegetable oil.


I made a sauce by heating up a can of diced tomatoes, and then smashing the ever-loving heck out of them with my potato masher, and added some crushed red pepper flakes, thyme and basil.


These rice balls were incredible. So incredible, that I think I’ll do the same thing with the last pan of it that I have in the fridge, although I was planning on adding some corn and chili powder and then topping it off with crushed tortilla chips and cheddar cheese.

The basic casserole:

  • 2?? cups uncooked rice
  • 2 pounds of ground meat (I used up the venison left
  • 1 large yellow onion, diced
  • 2 green bell peppers, diced
  • 1 carrot, diced
  • 5 cloves of garlic, minced
  • 2 four ounce cans of mushrooms
  • 1 very large can of cream of mushroom soup
Cook rice.
Brown meat in the skillet.
Sautee the veggies in another skillet.
Mix everything together with some salt and pepper, then divide into dishes.

You can add just about anything to this. The first night, before any of it was frozen, I just dumped some hot sauce on it. The Professor mixed in some barbeque sauce. We were both simultaneously disgusted by the other’s choice, and more than happy with our own.

Saturday, December 1, 2007

Salvaging the Vegetables with Butter

I found some meat on sale at the grocery store on Thursday; London Broil, which I have never cooked in my life. But it was red meat - which I've been craving lately - and it was on sale! But London Broil isn't something I'm very familiar with.

Poking around the nets, I discovered that I'd have to cook it medium rare if I wanted to be able to cut it. Which is fine with me, but the sight of blood sends The Professor running for the nearest take-out Chinese place. But I decided I'd cook it medium rare, and if he didn't like it I'd just cook the hell out of it and make him pretend to enjoy the shoe leather.

Karma's a bitch.

I overcooked the whole darn thing. One minute it was smelling heavenly, nearing perfection...the next minute it was obvious that I'd be better off trying to turn it into some kind of jerkey. The Professor was pleased, though, because I wasn't trying to turn him into a "blood sucking vampire" by feeding him "raw meat".

But the vegetables!! Oh, those were good. Even though I got started on them a little late, they were so yummy that I'm already dreaming of cooking them again. I cooked them a bit in the skillet and then tucked them around the meat in the oven.
Healthy? No.
Cheap? Yes.
Eye-closingly butterry good? Absolutely.
2/3 is a majority, so I'll be doing these again. Soon. Very soon.


Buttery Veggies

  • 3 carrots, cut into bite size chunks
  • 1 yellow bell pepper, cut into bite size chunks
  • 1 tbsp olive oil
  • 3 Tbsp butter
  • 1 heaping teaspoon minced garlic
  • 1 heaping tsp dried savory (or thyme)

    Heat the olive oil in a medium skillet; add the carrots and saute on medium-high heat for about 5 or 6 minutes. Add the bell pepper, and continue cooking for another 2 or 3 minutes.

    In a small bowl, combine the rest of the ingredients (and then add a quick twist of pepper, simply because you can never resist your pepper mill).

    Put the vegetables in a small oven-safe dish - something just big enough to hold the vegetables - and dollop the butter mixture all over them. Cook in the oven until the carrots are soft and they're all floating in more butter than your thighs want to think about - approximately 15-20 minutes.

Tuesday, November 27, 2007

Sugar Cookie Rebel

I am a rebel.

I used to be such a good, shy, demure little cook; baking things exactly as the recipe stated. Ruthlessly measuring and leveling off the cups and spoons. Because, as many bakers will tell you, if you mess with that magical chemistry that happens between the the flour, the sugar, the salt, etc - LIFE AS WE MAY KNOW IT MAY CEASE AND IT WILL ALL BE YOUR FAULT. Or worse, your cake won't rise.

But in one afternoon, I became a new person.

It happened fairly quickly. I realized I was one egg short of the recipe (you know, as in "She's one sandwich short of a picnic?). So I put in a little less flour.
Then I saw that the recipe wanted me to use almond flavoring, but I trumped that with my vanilla.
Next to go was the cream of tartar, mostly because I didn't feel like digging it out. I mean, after the egg and the almond flavoring, the world was pretty much doomed, right? So why waste 45 precious seconds trying to find that little bottle?
And then...then I got even crazier. I saw the cinnamon in my cabinet when I went to grab the bag of sugar. One minute I was reaching for the white powdery goodness, the next I was laughing manically with a spice bottle in my hand. Luckily for The Professor's students, I remembered to go back for the sugar.

If the world ends tomorrow, I'll apologize for not going back for the cream of tartar.


Cinnamon sugar cookies

  • 1 cup butter
  • 2 1/4 cups powdered sugar
  • 3 eggs
  • 4 cups flour
  • 2 tsp baking powder
  • 1 tsp baking soda
  • 1/2 tsp salt
  • 1 tsp vanilla
  • 1 Tbsp cinnamon
  • Cinnamon sugar (optional)
Preheat oven to 375F.

Cream butter and sugar together. Add eggs and vanilla, and combine completely. I've taken enough chances here, let's not add "under-beaten eggs" to the list.
Sift together the flour, baking powder, baking soda, salt and cinnamon. Gradually add to the butter mixture.

This was originally a rolled cookie recipe - so if you'd like to clean your cookie cutters later, go ahead and refrigerate it for about a couple of hours, then shape it into logs and cut it into cookies.

If - like me - you are way to lazy to do all that, drop them with spoons onto a greased cookie sheet. And pray that they don't spread too much.

Now, if you are one 1/16th of the cinnamon freak that I am, you will grab your cinnamon sugar and shake a little over each cookie. Then you'll realize you're drooling over the thought of cinnamon sugar and feel a little ashamed.

Bake for about 10 minutes, but these burn pretty quickly - so keep an eye on them. OR THE WORLD COULD END.

Notes:
I doubled the original recipe, so this makes a lot of cookies - about 4 dozen. But I'm sure that The Professor needed the challenge of 19 year olds on a sugar high, so I refuse to feel guilty.

I started off with the oven at 350F, but turned it up a bit because the cookies were spreading a wee bit too much. I have no idea if this is why they stopped spreading, but I'm going to claim it as a another moment of genius.

The recipe I was looking at is in the "Betty Crocker New Cookbook". I'm not sure what my brain actually saw - but that's where I started from.

Monday, November 26, 2007

Something like Shepherd’s Pie (and an apology to all of Ireland)

Can you call something Shepherd’s Pie if:
A) You’ve never seen an actual, honest-to-goodness shepherd in your life?
B) You’re pretty sure there isn’t a shepherd within easy driving distance?
C) You will not be feeding said Pie to anyone who remotely resembles a Shepherd?

To be sure I wasn’t breaking any laws that would get me banned from Ireland for life, I told The Professor to bring out his robe and carry a staff for a while, and maybe shoo the cats from one room to another. I didn’t get very far with any of those requests.

So, Ireland, I want you to know that I tried to be as close as possible to a shepherd, but my husband didn’t feel like “playing any wacky games tonight”.
Oh, and I had no lamb, so I made do with ground beef.
I’m losing you, aren’t I, Ireland?
But I love me some Jameson’s in my coffee, and I absolutely adore the color green. So please let me come back one day if I promise not to call this Shepherd’s Pie anymore?

Something like a Shepherd’s Pie

1 pound ground beef
2 tbsp butter
1 medium yellow onion, chopped
1 green bell pepper, chopped
3 carrots, sliced
2 celery stalks, sliced
1 garlic clove, minced
1 can diced tomatoes
2 tsp time
1 ½ cups of gravy (you can substitute some beef broth and a couple of tablespoons of flour)
Pepper to taste
3-4 cups of mashed potatoes

Start browning the meat in a medium skillet. Cook throroughly.

Melt the butter in a large skillet on medium heat. Add the carrots and cook for about 3-4 minutes. Add the onion, bell pepper, celery and garlic. Cook for about 8-10 minutes or until vegetables are mostly softened.

When the meat is finished browning, drain in a colander and add to the vegetables with the can of tomatoes and the thyme. Pour in the gravy, and mix thoroughly. Add the pepper and pour the whole she-bang into a casserole dish.
Spoon the mashed potatoes on top, spreading to cover.
Bake for about 30-40 minutes.
If you really want to rock someone’s world, serve with some cheese grated on top. OR, add the cheese and pop under the broiler til it gets kinda crispy and yummy.

Thursday, November 22, 2007

Taco Seasoning: Work in Progress

I need suggestions!

I've been working on making my own taco seasoning. I know I have all the right spices in my cabinet. Getting them together in beautiful harmony...it's not as easy I would like. I'm coming around to the realization that everything which flows from my magical spoon isn't automatically perfect. Therapy will start soon.

And by the way, "I've been working on my own taco seasoning" means that I've made exactly two attempts that included actually paying attention to what I was doing.

So here is attempt #2. I thought it was pretty good, if a bit spicy. The Professor was....well, the word "appalled" comes to mind. But 1) he doesn't care for any kind of Tex-Mex food and 2) he doesn't like anything remotely spicy. So I don't think his opinions count here.

I made the switch from chili powder to chipotle chili powder (oh! How I love thee!) this time, and that change is going to stick around.

I used all of this on about 2 1/2 pounds of ground meat (or meat substitute for the Best Friend). I think I'll cut back the next time. Because really, you shouldn't have to funnel margaritas down your throat to put out the fire in your mouth.
Or should you?

Taco Seasoning

1 Tbsp chipotle chili powder
3/4 tsp garlic powder
1/2 tsp onion powder
1/2 tsp crushed red pepper flakes
1/2 tsp paprika
2 1/2 tsp cumin
1 tbsp kosher salt
1 1/2 tsp white pepper

Mix it all together in a bowl and sprinkle on the cooked beef in a skillet.
I dissolved about a tablespoon of cornstarch in a cup or so of water, and then added that to the skillet and cooked the whole thing for about 2 or 3 minutes. This didn't really work to get the "wet" consistency I was going for, so I'm going to work on that too.


Taco Night 2007:

Tuesday, November 20, 2007

Breakfast Casserole - it's good for what ails ya

Add together:
Five girls, all teetering on the age of the big 3-0;
Two nights of girly-girl-ness that made The Professor glad we don't all live in the same city;
I didn't keep count, but there may have been a celebratory drink - or 1,000 - handed around;

And you get:
One very happy Birthday Girl

Breakfast for my weekend guests needed to be simple. But full of all the kinds of food that would be guaranteed to go straight to our thighs and make us relish each and every bite while secretly wondering if any of our Abs of Steel videos are still lying around.


Breakfast would have gone perfectly, but in all the festivities I forgot to make it. So instead of letting the casserole sit in the fridge overnight, gently soaking in the basil-infused eggs and milk, it was hastily slapped together and pushed in the oven.

It seems the memory really is the first thing to go.

Breakfast Casserole

  • 6 cups of cubed French Bread (it was about 3/4 of a loaf), divided
  • 8 eggs
  • 2 cups of milk
  • 2 tsp dried basil
  • 1 1/2 cups of grated cheddar jack cheese, divided
  • 1/2 pound of sausage, cooked and crumbled
  • 1/2 pound of bacon, cooked crispy and crumbled (see notes for the vegetarian version)
In a medium mixing bowl, whisk the eggs, milk, basil and a twist or two of fresh cracked pepper together until frothy.
Place half of the bread cubes in the bottom of a casserole dish.
Sprinkle the cooked bacon and sausage over the bread.
Sprinkle half of the cheese over the top.
Layer the rest of the bread on top of that.
Pour the egg mixture slowly over the entire casserole, making sure to cover the entire dish.

Cover the casserole and place it in the fridge overnight.

Note: If the beer and cold meds hadn't gotten in the way, I would have remembered to do this the night before. Learn from my mistakes.

Preheat the oven to 375.
Sprinkle the remaining cheese over the top of the casserole.
Cover very loosely with foil. And I mean loosely - we don't want to leave any of that lovely cheese behind, because then it sticks to the foil and I'm forced to stand over the dish picking it off while everyone waits to be fed. Maybe I just revealed too much personal information?

Bake for about 45-50 minutes, making sure that the middle is completely done before serving.

Notes:
I've made this with cinnamon or alspice in place of the basil, and it's just as yummy.
Many times I've made this with veggie-sausage patties that I nuke and then crumble. Many people never noticed that they weren't eating real sausage. I usually use about 6 of the frozen veggie patties. I have a sneaking suspicion that some of those flavored veggie burgers - like the sun-dried tomato and basil versions - would work even better.

Tuesday, November 13, 2007

Veggie Goulash


At around 8:30 this morning, I got an email from The Professor letting me know we’d be having an overnight guest. I wasn’t going to be home until about 7 PM – five minutes before the two of them got home. I started thinking about what my cozy love nest currently looks like:

  • The weekend’s newspapers are all over the coffee table and love seat.
  • Every pair of shoes that I’ve kicked off at the front door in the last week are...under the table by the front door.
  • The junk mail on the dining room table has started breeding. That is the only explanation for the quantity of worthless credit card and pressure-washing offers we now own.
  • All the boxes of ingredients needed to make the snacks I promised the girls for this weekend are sitting on the kitchen counter – because there isn’t room for one more thing in the pantry.

  • Oh, and I needed to find dinner.

So, for the next 8 hours at work, my brain percolated on what I had in the house that could be transformed into a fast meal. Pretty much, it was going to be vegetables, since the meat is all frozen. Hopefully cooked vegetables.

This vegetable skillet thing is something I do to clean out my fridge every now and then, and it always tastes different because I use different seasonings and different fresh/canned/frozen vegetables. It’s starting to get a little chilly outside, so I decided to use my cumin (oh! I how I love thee!). This stuff is yummy when fresh, it’s yummy if it sits on the stove cooking for a while, and it’s yummy the next day as leftovers for lunch.

Luckily, the guest of the night is someone I could feed celery and peanut butter to, and he’d be happy. I love friends like this.


Vegetable a la Goulash

  • 1 cup uncooked basmati rice
  • olive oil
  • 3 carrots, sliced
  • 2 parsnips, sliced
  • 1 onion, sliced
  • 2 stalks of celery, sliced
  • 1 cup? Frozen spinach (I just grabbed a big handful out of the bag in the freezer)
  • 2 tsp minced garlic
  • 4 oz can of mushrooms
  • 1 can whole tomatoes with juice (I ran my knife through them to cut them up a bit)
  • ½ tsp crushed red pepper
  • 1 tsp marjoram
  • 2 tsp paprika
  • 3+ tsp cumin
  • 7 ½ ounces (1/2 can) tomato sauce
  • Salt and pepper to taste

Start the rice cooking immediately; it’s going to take the longest (boil 2 1/2 cups of water with a dash of oil and salt, add the rice, stir and cover). Or just use minute rice later.

Slice the carrots, parsnips, onion and celery and put them in a large sauté pan with the olive oil. Cook for about 5 or 6 minutes, until the carrots and parsnips are beginning to soften.

Add the garlic to the pan and sauté for another minute or two.

Add the drained mushrooms, the UN-drained tomatoes and the seasonings. Taste and adjust the seasonings (I needed lots more cumin and a little more black pepper).

Add the spinach (yes, frozen) and stir.

If you need more liquid (I did), add the tomato sauce - and maybe a dash of that wine you’ve been sipping. Let it simmer in the skillet while you refill your wine glass, set the table and make small talk for about 10 or 15 minutes.

Serve over the rice, while you desperately hope that it’s good enough to keep your impromptu dinner guest from noticing that your stepson left behind ONE sock from his weekend visit. And that it’s under the coffee table.

Saturday, November 10, 2007

Gearing up for a weekend of girls

My girls are coming to visit next weekend! I've known them since the 7th grade, and they're coming down for a couple of days because 2 of us are turning 30. There's going to be a lot of food as we try to forget about it.

  • I had a serious thing against cream of mushroom soup when I was growing up; the canned stuff never looked all that great unless they were mixed up in a tuna casserole. Eating it as a soup seemed incomprehensible. There have been a few homemade versions floating around out there, lately. This Creamy Mushroom Soup with Sauteed Chantrelles looks like it's about time to break down my mental walls.
  • Something very much like these Garlic Roasted Green Beans are probably going to make it - in some form - to my (very small) Thanksgiving table this year. We served Haricot Verts at the restaurant in a garlicy oniony olive oil, and I loved them.
  • Sometimes I think I could live off of dips and appetizers. Dips like Hot Swiss Chard Artichoke seem like a little bowl of heaven. Maybe I'll have to test that theory out one day.
  • This is just plain scary. Frightening. Slashfood linked to an article on the 88 most unhealthy fast food items. It looks like it's completely based on trans fats. I was happy to see that at least my beloved Taco Bell's soft tacos (please don't think less of me) won't kill me as fast as all those french fries and onion rings would have.

Thursday, November 8, 2007

Pan Fried Gnocchi = True Love

Warning: there are a lot of superlatives in this post. And I never use one more than needed.

About once a year, my in-laws come to visit for a few days. One of the benefits is that they are really good cooks. The first time they visited, my father-in-law started to make gnocchi, which I learned is a family necessity. When he got into my kitchen and saw my spice cabinet and the stand mixer, he made a list of things to make. Huge meatballs, an incredible vodka sauce, pepper biscuits, meaty tomato sauce, biscotti...I felt like I was in a restaurant. Except I had to wash the dishes.

When they make gnocchi, they make a ton. And I mean a TON. I didn't realize where they had all gone, until I looked in my freezer after they left. There was a huge bag of them, ready for us to gorge ourselves on whenever we felt the urge. Which, to be frank, was very soon.

These are not made of potato; it's pretty much flour, ricotta and egg. Simplicity that shines.

So, I have a few left in my freezer. Just enough for The Professor and I for dinner. I've seen a few recipes around for pan fried gnocchi. I have some butter and a hunk of Parmesan that needs to be used.

It's like fate walked into my kitchen and made dinner for me.
But I still had to do the dishes.

I'm not going to do the step-by-step on the gnocchi process; you'll have to get them on your own.
In fact, I have no clue how much of anything I used. I'm not going to be much help for the recipe. But that's because my brain is still busy thinking of the buttery taste left in my mouth.

Pan Fried Gnocchi

In a skillet, melt about 3 or 4 tablespoons of butter. Take about 40-45 {frozen} gnocchi (these are pretty small) and add them to the skillet, making sure they're as separated as possible. Otherwise as they start to get soft, they'll become more of a gnocchi pancake. Which will still be yummy, but not what I was going for. Tonight, anyway.

Now, the hard part - don't start messing with the pretty little suckers! Let them get all soaked in butter, let them sing to the gods of dairy. You can't see it, but they are busy. Busy getting themselves all crispy and ready. Because they know what's coming.

After about 5 or 6 minutes, their little bottoms are going to be turning a luscious golden brown. Grab a clove or two of garlic, and mince it and sprinkle it all over the pan. Now you can start flipping them over. I ended up just pulling out my tongs, because the spatula gave me fits. After I flipped them, I cut up a couple more tablespoons of butter and dropped it around the pan.


Now, to keep myself from popping a couple of under-fried pieces of yumminess in my mouth, I got busy grating a few tablespoons of Parmesan. By the time I was done, my pieces of goodness were ready. I slid them on my plate, sprinkled the Parmesan. And sat down to one of the best simple dinners I've had in a while.

Tuesday, November 6, 2007

Creamy Chicken Curry = YUM

I’ve had this whole chicken sitting in my fridge for a little over 48 hours now. I haven’t cut it up or anything. I was starting to think I should just name it. Then I realized how silly that was. And since I wasn’t even drinking at the time, I had no reasonable excuse to tell my husband I was going to be cooking up a piece or two of Ricardo for dinner.

Oh yes. The chicken is totally named Ricardo.

There was something specific my subconscious self wanted me to do with Ricardo. I’ve been craving something. Problem was, I didn’t know what. And when I caught myself looking at recipes with curry in them, I thought… maybe I’m craving some chicken curry? But that seemed way too obvious, so I moved on.

Then I got home from work, and saw the buttermilk sitting in my refrigerator. Why did I buy buttermilk? I don’t drink the stuff.

Hmm. ...

Chicken.
Curry.
Buttermilk.

I bet I can do something with that.

Now that I’ve mentioned how much I wanted to use curry powder a few times, I’ll go ahead and tell you: I used Penzey's Singapore Seasoning for this instead because, well… I LOVE their Singapore Seasoning. Since they have quite a few ingredients in common (coriander, cumin, garlic, onion, tumeric, ginger, cloves) I do NOT consider this cheating.

And my craving?
It’s gone.
  • Olive oil
  • 1 Whole chicken, cut into pieces (I removed the skin and most of the visible fat. Damn health concsciousness!) You can also just subsitute about 6 or 7 bone-in chicken thighs.
  • 1 large Onion, chopped
  • 3 small carrots, peeled and sliced
  • 3 cloves of minced garlic
  • 1/2 tsp ground ginger
  • 1/2 tsp cumin
  • 1 tsp Whole mustard seeds
  • 2 Tbsp Penzey's Singapore Seasoning Blend
  • 1 tsp tumeric
  • 1 1/2 cups chicken stock
  • 1 1/2 cups buttermilk (I think plain or greek yogurt would also work great)
  • Basmati rice
In a large skillet (that you can cover with a lid) brown your chicken pieces in the olive oil; remove the chicken and add the carrots. After about 3 or 4 minutes, add the onions and garlic and sauté until the onion is crisp-tender. Add the ginger, mustard seeds and cumin. Cook until the mustard seeds "pop" - this is so much fun, that I hereby vow that I'm going to cook with my mustard seeds more often.

Add the tumeric and Singapore Seasoning powder, and stir your now very yellow concoction for about 2 minutes so that everything starts to meld. Is it a sign of my geekiness that I can't think of the word "meld" without thinking of Spock? And then getting a little turned on?

Add the chicken broth and buttermilk and stir some more, just until it begins to think about simmering. Put the chicken back in the skillet, cover, and simmer , stirring it every so often, for about 40 minutes or until the chicken is done (Harmful bacteria was not an ingredient in this recipe!).

When the chicken starts simmering, start cooking the basmati rice. If you're lucky they'll be finished at the same time. Serve the chicken over the rice. If you really want to treat yourself, make some naan to go with it, but...I was just too lazy today!

Sunday, November 4, 2007

Venison Lasagna? Is that legal?

A few months ago, a friend of mine gave me a VERY LARGE log of frozen ground venison. He also gave me a 6 pound venison roast. After the roast - finally! - thawed out, it made an incredible meal. But the ground meat has been buried in my freezer ever since. Part of the reason is that he wasn't sure if it was sausage or ground meat. It wasn't marked on the outside, and he couldn't remember what his friend (the hunter) had told him.
Saturday, I thought of a way to use it that would be ok with either option: lasagna.

But I only needed one pan of lasagna, and I had about 3 or 4 pounds of meat. Frozen solid, which meant that it was all or nothing. So I made a bunch of different rice/meat casseroles (details later). And one very yummy looking lasagna.

I can never remember what order things go into a lasagna. A layer of sauce underneath the noodles? How many layers do I really need? The ricotta goes on top of the noodles, but aren't the noodles supposed to have sauce on both sides? Is it ok if I just mix it all up and bake it? Can I go back to experimenting with my new canner now?
In the end, I pour another glass of wine and just start putting things in a pan.

So, every time I make one of these suckers, the layers are probably in different orders. And every time, it tastes fantastic.
I used a 9x9 inch pan, so you have to be creative with the noodles. Being creative in the middle of making something, inevitably calls for another glass of wine. It's a good thing we found a sale this week.
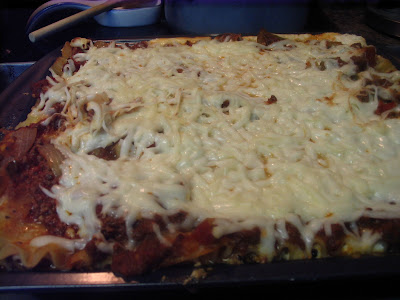

Venison Lasagna

  • 1 pound ground venison (or other meat)
  • 1 medium onion, chopped in big-ish pieces
  • 1 green bell pepper, chopped in big-ish pieces
  • 2 cloves garlic, minced
  • 1 pint tomato sauce (I used homemade, which has a ton of herbs in it already)
  • 1/2 pound button mushrooms, sliced
  • as many lasagna noodles as you need for your pan and your layers (I had 9 I think)
  • 1 1/2 cups cottage cheese
  • 1 1/2 cups ricotta cheese
  • 1/4 cup fresh grated Parmesan cheese
  • 1 cup mozzarella cheese


Preheat oven to 375F
Begin cooking lasagna noodles til their as soft or firm as you like - I tend to under-cook them, because this sucker's going to go in the oven.

Cook the venison in a skillet until done; drain in a colander and then transfer to a large bowl. Try to leave some grease in the pan. Sauté the onions, garlic and pepper. Add to the venison.

Sauté the mushrooms, being careful not to over-cook them. Add the mushrooms to the venison. Pour the tomato sauce over the venison mixture and stir until it's all mixed up and you're ready to just grab a spoon instead of going to the trouble of building a lasagna.

If it's too dry for you, you can add some plain canned tomato sauce. I like mine chunky, though, so I rarely have to do that. Taste your mix, and decide if it needs any salt, pepper or whatever seasonings you like to taste. I put in a little more basil, because in my world there is never enough basil.

In a separate bowl, mix the ricotta, Parmesan and cottage cheeses with a little fresh ground black pepper to make it look interesting. This stuff is awesome eaten with a spoon. Or on a Triscuit. Or even in lasagna.

OK, now the fun begins. I *think* this is the order I put things together this time.

Get your 9 inch square pan and spray some cooking spray on it.
Put a layer of lasagna noodles. Mine were too long, so I let them curl up the sides of the pan - so it'll hold all the goodies that are about to get added.
Add half of the ricotta mixture in dollops all over the noodles, then spread it evenly around.
Put about 1/3 of your sauce/venison mix even over the top.

Get another layer of noodles. This time, I cut about 1/3 of the length off so that the noodles would fit in the pan.
Dollop the rest of the ricotta mixture on the noodles and spread it evenly.
Put half of the remaining tomato/venison mix evenly across the top.

Do one final layer of noodles. At this point, I only had one whole noodle left and I cut it to fit the pan. Then I used the pieces I had saved to cover the top. I wish I could brag that I had planned it this way from the beginning, but in reality...I started freaking out back at the 2nd layer of noodles that I didn't have enough cooked. Cutting them was my lazy way of getting out of boiling another pot of water. Because, you know, boiling water is so darn hard.

Back to the lasagna...
Put your patchwork noodle pieces on top.
Spread the rest of your tomato/venison goodness on top.
Sprinkle the mozzarella cheese across the top.

The lasagna will probably be bulging out the top of the pan at this point, so put it on a baking sheet (with sides) to catch the juices that are going to bubble over. Loosely tent a piece of foil over the top, and put it in the oven for 35-40 minutes. If you want your cheese to be browned and bubbly on top, take the foil off for the last ten minutes. If it still doesn't get bubbly enough for you, turn the broiler on.

After it cooled, I froze this to feed to my out of town guests in a couple of weeks. I'll be making a vegetarian version next weekend to go with it. I still don't know what'll be in that one.

I've never frozen a baked lasagna before, so this is an experiment. It sure smelled good coming out of the oven, though:

Friday, November 2, 2007

Canning Tomato Sauce and Pickles

My sister found a great deal on a set of canning equipment a couple of weeks ago, and neither one of us even tried to resist. A 10 Qt pressure cooker/canner for $25? Count me in.
Thus embarks the great Canning Season of 2006.

Now, it’s really past the time I could be canning anything from my garden. The green tomato salsa from a few weeks ago is the last of the fresh produce from my garden this season.

But last Saturday, The Professor saw a seedless watermelon at the grocery store. And he wanted one last watermelon for the year. So what to do with the rind, other than make watermelon rind pickles?

My grandmother made these, and as I was growing up, they were always available at her house. None of my family got the recipe (that we can find), but there’s still a great aunt out there who may have it. I haven’t given up. But last weekend, I had to just hunt around the ‘nets and do something on my own. We haven’t cracked them open yet, but I’m going to wait for my grandmother’s recipe to post anything. Besides, my first canning trial resulted in a pint of broken pickles. Not exactly something to brag about on my blog.

Then, the next day, we came across a farmer selling the last of the season’s tomatoes. Yes, in the Deep South, you still get tomatoes at the end of October. So I bought 3 pounds, made up some tomato sauce and canned 3 pints worth. I had just enough left over to toss with some penne for dinner, and we are going to have some incredible pastas in the next couple of months.

So, I have no recipes for you today. Tomorrow, I’m going to make venison lasagna, so you’ll have to hold out for that. In the meantime, here’s a shot of my stove while I was preparing to can the sauce:

Tuesday, October 30, 2007

Mushrooms. Granola. CRABBIES!

Note: In case you're worried, I did not combine those three ingredients together.
Yet.

It was a busy cooking weekend here at the ranch. OK, I don't live on a ranch, other than in my dreams. But it was still a busy weekend.

Saturday, we had The Clay King over for dinner. A roasted chicken, some twice baked potatoes and sauteed mushrooms - the man does not enjoy vegetables, so I take cooking for him as an excuse to have a mostly unhealthy meal.
Here are the mushrooms - they are the one thing The Professor likes to cook, which means they must be black. Sigh.


Good times, as we watched both the Red Sox and the Ohio State football team win. The appetizer - a modified version of these crabbies - has been declared a new staple of living by The Professor. I cannot recommend these enough - I made 40 of them and froze half, but The Professor has wanted a few every night. There are only 4 left in the freezer, and I know he'll eat them as a snack tonight when he gets home.


Sunday, I moved on to rye bread, tomato sauce, watermelon rind pickles, and granola. I found a farmer selling about 3 pounds of tomatoes - the last of his crop - for a total of $3.50. As soon as I cut into them, the smell reminded me that I wouldn't have any this good for almost a year. But the tomato sauce is in the canner as we speak, so I can keep the yummy taste around for a bit longer.

The real thing I'm excited about is the granola. I saw this recipe, and couldn't believe it would be this easy. But it was. And holy cow, do breakfasts have a new meaning. I just dump it on some low-fat vanilla yogurt in the morning, maybe stir in some frozen blackberries... and I'm on my way to a healthier me.


I changed a few ingredients around because I do NOT do almonds, and I couldn't find any pumpkin seeds. But that's the beauty of this - you can change it around as much as you like, and it'll still be incredible.

Granola (adapted from Smitten Kitchen)

3 cups old fashioned oats
1 1/2 cups sweetened flaked coconut
1 cup crushed walnuts
1 cup sunflower seeds
1/3 cup packed brown sugar
1/2 cup honey
1/4 cup vegetable oil
1 tsp cinnamon (I LOVE cinnamon)

2 cups dried fruit (Favorite combination: crushed banana chips and dried cherries or cranberries)

Put the rack in the middle of your oven and preheat to 375F.

Mix everything but the dried fruit in a big bowl. Line a large baking sheet with waxed paper (no parchment paper here), and spread the mix evenly. Bake for about 25 minutes, stirring every five. This stuff changes color fast, so keep an eye on it. Make sure to take a deep breath through your nose every time you open the oven, becuase nothing smells like cinnamon.

Transfer to a clean baking sheet, and cool, stirring a couple of times so it doesn't clump up. Stir in dried fruit of choice, and keep in the freezer.

Friday, October 26, 2007

Getting ready for weekend cooking

We're having a friend over for dinner tomorrow night. He is a major carnivore - won't touch anything that looks healthy. And we were originally supposed to be having another good friend - who happens to be vegan - over at the same time. It's always fun cooking for the two of them together. But the vegan's girlfriend had other plans for him, so it looks like it's meat and potatoes tomorrow night. And wine. Lots of wine. Because I'm convinced the reason the Red Sox have won the last two games is because I was drinking wine from my very favorite glasses during the entire game. I'm just giving like that.

  • I'm actually thinking of making these tomorrow. We'll be watching the game after dinner. And I'm sure The Professor will want to pull out something sweet, so I'm going to try Coconut Burfi. And if I'm lucky, no one else will like them so I can have them all to myself.
  • I'm also ready to try something a little healthier for my morning breakfast. I want it to be something I can put together really fast in hte morning, because I do not like to waste precious minutes that could have been spent sleeping. So...I'm going to make my own granola on Sunday. Smitten Kitchen has a really good sounding recipe up. I just have to figure out what dried fruits I want. I have banana chips and dried apples. If I can find some dried pears, I think I'll try those.
  • Finnish Carrot casserole anyone? I'm thinking this would be good to make and take for lunches for a few days. I have never heard of a casserole devoted to carrots, but they are one of my favorite vegetables.
  • And these crabbies...cheese, garlic, onion, crab, bread... I'm in love already. And I may have just talked myself into doing these as an appetizer tomorrow night.

Wednesday, October 24, 2007

Baba Ganoush and Flat bread

Baba Ganoush
Baba Ganoush
Baba Ganoush

It's just fun to say. Go ahead. Say it out loud three or four times. It'll make you feel better. It might also be suspicious activity that will make your loved ones look at you funny – but if you’re like me, you won’t notice because you get that look often.

I don't particularly like hummus, which is because I'm not wild about garbanzo beans. I am over the moon for eggplant though. And baba ganoush is basically hummus made with eggplant instead of chick peas. The eggplant I found this past weekend was predestined to be blogged about. And when I was about to hit "GO!" on the food processor, the jar with one big piece of roasted red pepper in the fridge started yelling at me to be used. So I threw it in the mix.

When I started thinking about making the dip, though, I forgot one important thing: Most people don't just eat this with their fingers. I needed flatbread or something. And I did not feel like going back to the store. Which gave me an excuse to try making homemade pita bread!
I was amazed when I took it out of the oven and it had actual little pockets – like real pita bread! Because, you know, I was so afraid of making artificial pita bread.

Now, I was lucky enough to have tahini in my pantry. I am unlucky enough to have a completely disordered pantry. So when I went hunting for the tahini, my incredibly graceful self knocked over a box of pasta, which pushed over a jar of something, which rolled a wee bit before knocking the tahini off the edge of the shelf.

The lesson I’d like you to learn: Tahini splatters.


Baba Ganoush: (adapted from: http://www.mediterranean-food-recipes.com/babaganoush.html)

  • 2 large eggplants
  • 3 tablespoons lemon juice
  • 2 1/2 heaped tablespoons tahini (sesame paste)
  • 2 cloves garlic – peeled and minced
  • one very large piece of roasted red pepper
  • ¼ teaspoon salt

Pierce the sides of the eggplant with a fork four or five times. Put the eggplants on a baking sheet and put them in a 350F oven for 45 minutes. (The original recipe says to turn them, but…um…I forgot).

Cut the eggplant in half lengthwise and scoop out all the yummy goodness inside into your food processor (yes, I broke down and pulled it out for this). Add the garlic, tahini, lemon juice, peppers and salt. Give it all a whirl until it’s nice and pureed.
Serve with pita bread

Pita Bread: (almost verbatim from here, because it’s perfect as is: http://www.slashfood.com/2006/05/27/homemade-pita-bread/)

  • 2 ½ tsp yeast
  • 1 ½ cups warm water
  • 1 tsp sugar
  • 1 tsp salt
  • 2 cups all purpose flour
  • 2 cups wheat flour
  • Olive oil, as needed

In a large metal bowl, mix yeast, warm water and sugar. Let it proof for about 10 minutes. Add salt and about 3 cups of flour (whatever combination you’d like). Add the remaining flour ¼ cup at a time until the dough forms a ball.

I knead my dough in the bowl – I have a nice wide metal mixing bowl, and it keeps me from getting flour all over the counter, so I don’t have to go hunting for stray particles of flour under my microwave. Knead for about 4-5 minutes, until smooth. Place in a lightly oiled bowl, cover with plastic wrap, and let rise until doubled in size, about 1 hour.

Put your rack in the center of your oven and get your broiler going. Lightly oil a baking sheet.

Punch the dough down and divide it into about 10 pieces (I roughly shaped it into a log and then used a steak knife to cut it into 9 pieces that were about the same size).

Form dough into balls, and cover with a dish towel. Leave to rest for about 10 minutes.
Roll balls into disks that are about 1/8” thick. (I have no clue how thick mine were, but they were probably more like ¼”).

Place 2-3 disks on a baking sheet and broil for about 2 minutes per side. Watch them – as soon as you turn your back, they WILL burn.

Remove from pan and let them cool between kitchen towels (it holds the moisture in). Once cool, store in an airtight container.

Here's a shot of them vey close to finished while baking:


And here's a shot proving that there are actual little bitty pockets deep in there (yeah, it's a horrible picture,but I was so proud of my pockets!):

Monday, October 22, 2007

Oatmeal Cookies - Who says you have to follow the recipe?

The Professor has developed a serious addiction to oatmeal cookies. The cafeteria at his job has them 3-4 times a week, and now he believes that he can’t live without them. The cafeteria’s cookies are surprisingly good. But every once in a while they go too long without serving them, so he comes home and begs me to make some. I love it when he begs.

I took a Betty Crocker recipe and changed it around, since the two of us don’t need 2 dozen cookies. I pretty much just cut everything in half, except for the egg. And since we have old fashioned oatmeal in the house and not the quick cooking stuff, that’s what I use. Which means that the extra liquid from the egg is a good thing. I think. I’m also making these rationalizations up as I go along.

End result: Oatmeal cookies that are a little chewier than usual. And a happy Professor. And that’s all that really matters in my world.

Unless there’s a shoe sale at Belk. Then The Professor’s on his own.

Oatmeal Cookies

¼ cup Splenda
¼ cup packed brown sugar
4 Tbsp butter, softened
1 Tbsp butter flavored Crisco
¼ tsp baking soda
½ tsp cinnamon
½ tsp vanilla
1/8 tsp baking powder
1/8 tsp salt
1 egg
¾ cup old fashioned oats
½ cup all purpose flour
½ cup raisins

Preheat oven to 350F
Mix all ingredients except oats, flour and raisins until thoroughly blended.
Add flour and oats, and mix thoroughly.
Stir in raisins.
Drop by rounded teaspoons onto ungreased cookie sheet.
Bake about 9 or 10 minutes – they will burn quickly, so watch out!
Cool on wire racks if you can wait, or just eat straight out of the oven.
Yield: 12-15 cookies

Adapted from Betty Crocker’s Cookie Jar Cookbook

Sunday, October 21, 2007

Polenta = Halloween?

Weekend Cookbook Challenge chose Halloween as this month’s theme. I had promised myself I would participate this time…but I am not much of a creative thinker. And I don't have a cake mold in the shape of a pumpkin, a witch or any other Halloween-y thing. I do have cats, but neither one is black. And I probably wouldn't cook them anyway. Unless they transform ANOTHER throw into rags. But I digress.

I couldn't think of a good Halloween food. Other than Milky Way bars. But I am NOT up to making those from scratch.

So here's about a 1 minute stream of consciousness on how I solved this dilemma:

I sat down with a cookbook that I've never opened.
I saw a recipe for Polenta.
I've never made Polenta.
I bet Polenta would be good.
Polenta's made from cornmeal
Cornmeal comes from corn.
Corn is a fall food.
Halloween's in the fall.
I'll make Polenta!

Cornmeal comes from corn? My genius knows no bounds.

Crispy Polenta with Mushrooms, from Cooking for Two by Bruce Weinstein & Mark Scarbrough

1 1/2 tsp unsalted butter at room temperature, plus additional for buttering the pan
1 1/2 cups water
1/2 cup coarse yellow cornmeal
2 Tbsp freshly grated Parmigiano-Reggiano
1/2 tsp salt
2 Tbsp olive oil
1 small onion, thinly sliced
8 ounces cremini or white button mushrooms, cleaned and thinly sliced
6 Tbsp dry vermouth
1 Tbsp tomato paste
1/4 tsp dried thyme
1/4 tsp dried chopped rosemary
1/4 tsp freshly ground black pepper


  1. 1.) Butter a 1 quart round soufflé dish; set aside. I don't own a souffle dish, so I used my corningware – the point is to let the polenta set in something round.

  2. 2.) Bring the water to a boil in a medium saucepan over high heat. Stir in 1 Tbsp of the cornmeal with a wooden spoon, then immediately reduce the heat to low. Continue adding tablespoonfuls of the cornmeal, stirring each in before adding the next. Once all the cornmeal has been added, reduce the heat to very low and continue cooking for about 15 minutes, stirring constantly, until the polenta begins to leave a film on the bottom and sides of the saucepan. In these small quantities, polenta can scorch, so keep the flame heat low and stir constantly.

  3. Stir in 1 1/2 tsp butter, the cheese, and 1/4 tsp of the salt. Pour the hot polenta mixture into the prepared dish. Set aside to cool and firm up for at least 30 minutes while you prepare the mushrooms. Heat a medium skillet or sauté pan over medium heat. Swirl in 1 Tbsp of the olive oil, then add the onion. Cook for 3 minutes, or until golden, stirring frequently. Add the mushrooms and continue cooking for about 5 minutes, or until they release their liquid and it is nearly evaporated, stirring constantly.

  4. Add the vermouth, tomato paste, thyme and rosemary; bring the mixture to a simmer. Cover, reduce the heat to low, and simmer for 15 minutes, or until thickened like a sauce. Stir in the remaining 1/4 tsp of salt and the pepper. Set aside off the heat, covered to keep warm.
  5. Run a knife around the sides of the polenta to release it from the casserole dish. Turn the
    polenta out onto your work surface and cut it, like a pie, into 6 even wedges. Heat the remaining 1 Tbsp olive oil in a medium skillet or sauté pan set over medium heat. When the oil begins to smoke, carefully add the polenta wedge. Fry for about 4 minutes, or until lightly browned and crisp, turning once.

  6. To serve, divide the wedges between two plates. Spoon the mushroom sauce around and over them. Serve immediately.

Saturday, October 20, 2007

Weekend Shopping

Last weekend, my aunt gave me a $25 gift certificate to Bed, Bath and Beyond. And of course, now that I get to go spend money there, I can't find any of those 20% off fliers they put in my mailbox three times a week. But I'm finally getting a new pepper mill! And a new shower curtain! And I think I'll have about $5 left after that, so I'll go see what kind of kitchen type gadgetry I can find to spend money on. I love shopping for my kitchen.

  • Being part of the Deep South, this was really interesting. Why is Moonshine Still Illegal? I'm all for being able to make my own liquor. Alabama has some crazy laws about this kind of thing, though.
  • Meathenge did brisket. The pictures make me want to kidnap him and force him to cook this three times a week. Because then I'd apparently get to eat all that meat. I'm not sure how The Professor would feel about that, though. I think I'll just have to lust after the Biggle Brisket from afar.
  • I'm declaring Pumpkin Bread Pudding the most perfect sounding bread pudding EVER. Even better than the eggnog bread pudding I fell in love with last year. I am officially in love with all things pumpkin.
  • Hunt the Recipe has convinced me that the time in my life has come when I must try parsnips. I've never eaten or cooked with them, but they're on my afternoon shopping list so I can make a Fall Vegetable Pasta Bake.

Wednesday, October 17, 2007

OH NO! Green Tomato Salsa

Last week, I was all excited about my tomato plants being reborn. Then I found the scourge that is the tomato hornworm running a refugee camp in my plants. So I hurriedly harvested the green tomatoes, because I certainly wasn't going to let the dratted worms have all the fun. If they can eat my underripe fruit, then by golly so can I.

The only problem is...I have never made anything with green tomatoes. I've eaten fried green tomatoes. I've even watched part of the movie on TV. But I wasn't sure about breading and deep frying sliced roma tomatoes. Very small, immature roma tomatoes. And my hazy memories of the movie provided no inspiration at all

So I poked around the internets, and found some salsa recipes that I liked. And then, I promptly ignored the basket of green tomatoes and itty bitty onions (that I forgot I planted and found growing around my tomatoes) for about 4 days.


That was until I made the chicken stuff a couple of days ago. As I was cleaning up the kitchen, I kept looking at that basket. And then I saw the bowl that had held the paprika'd onion and bell pepper, and it has a little paprika residue all around the inside. And then I looked back at the tomatoes and peppers. And then, finally growing tired of my obtuseness, my Kitchen Muse knocked me on the side of my head with my iron skillet and roared "ROAST THE TOMATOES IN THAT BOWL, DIMWIT".

Being smart enough to listen to my muse when she starts throwing around my heavy kitchen implements, I promptly washed the cutting board and started cutting things in happy abandon.

Roasted Green Tomato Salsa

20ish small green Roma tomatoes, halved
10 very tiny white onions (or 1 medium), chopped
2 Tbsp olive oil
1 tsp paprika
1 tsp cumin
1/2 tsp ground red pepper
1/2 tsp ground chipotle pepper

*note - The Professor does NOT like spicy things, and I do. So I always start off pretty mild and then divide the salsa, spicing up my portion afterwards.

Preheat oven to 250F.

Put tomatoes and onions in an oven-safe bowl. In a separate bowl, mix olive oil, cumin, chiptle and red peppers. Pour over the tomatoes and onions, and stir to coat. Put in the oven, uncovered, for about an hour or until the tomato skins are shriveling. I love the taste of shrivelled tomato skins. mmm....where was I ?

Remove from the oven, and set to work with your potato masher. Or, if you like using your food processor, do that. I just hate to clean the damn thing. But I ended up getting it out because The Professor likes smooth salsas. Taste as you mash, and add more spices as you like. The Professor's portion of this was perfect for him, but I added another dash of each the red and chipotle peppers.

This salsa was completely unplanned, and since I was too lazy to go to the store and spend the $1 on fresh peppers, I just used what I had in my spice cabinet. But I'm going to try this next year, when I will hopefully have a little more motivation to use real peppers.

Tuesday, October 16, 2007

Chicken Paprikash. Kinda. Sorta. But not really.

I have a sneaking suspicion that when an actual chef goes into the kitchen to make a dish like, oh, say Chicken Paprikash, that:

A) He/She cuts the chicken up into beautiful, symmetrical pieces; OR
B) He/She doesn't accidentally throw the onions - that he/she just cried over while cutting - into the garbage bowl on the counter; OR
C) He/She doesn't forget to buy the damn sour cream; OR
D) He/She doesn't open the spice cabinet to find out that he/she doesn't really have enough paprika left to make what the damned dish is named after; OR

E) ALL OF THE ABOVE.

It's been a roller coaster of a week the past few days. Great family gathering. Disaster of an apple pie. Awesome Coconut Cream Dessert type thing. Major car repair bill.

So when I found a 3.76 pound chicken in the meat section of the grocery store marked down to less than $2, I decided it was time for a good, old-fashioned comforting type of chicken dinner. A whole chicken. Roasted? Cooked slow, definitely. Not too many ingredients. Easy, but filling.

And Chicken Paprikash was slow cooking, short on ingredients, easy and filling. But....well, see A through E above for what I didn't bargain for getting with this dish.

It ended up as a scrumpdidlyumptious meal, though, served over rice. With a very large glass of wine. For comfort. Not to mention for my mental state after balancing the checkbook with the car repairs thrown in.

Kinda Sorta Chicken Paprikash

3 1/2 pound whole chicken, cut into pieces (I froze the back and wings for stock)
  • 3 Tbsp vegetable oil

  • 2 white onions, chopped kinda big

  • 1 red bell pepper, chopped kinda big

  • 2 cloves of garlic, minced

  • 1 cup chicken stock

  • 1 Tbsp paprika

  • 2 tsp pepper

  • dash of salt

  • 1/2 cup half and half


Brown the chicken thighs and breasts in a large oven proof pot. If your pots not ovenproof, you'll just have one more dish to clean later, because you'll have to find something to use in the oven.


Remove chicken from your pot, and set aside. Add the onions, bell pepper and garlic, and sautee for about 4 minutes. Remove these from the pot too. Pour the chicken broth in the pot, and - if you haven't already picked them out and eaten them (not that I would do that) scrape up all the yummy brown things from the bottom of the pan. Add the paprika, salt and pepper and give it a good stir. Pour the flavored broth over the onions and peppers. Put the chicken back in the skillet, and pour the broth, onions and peppers over the chicken. At this point, it didn't look like I had enough liquid - I wanted a lot of sauce later - so I poured another 1/2 cup of chicken broth over the whole she-bang. Put in a 300 degree oven for about an hour, making sure the chicken is thoroughly cooked before you remove it.


Take the chicken out of the pan, and strain out most of the onions and peppers, leaving the brothy heavenliness in the pan. If I had more paprika, I would have added it here. Add the half and half to the broth and stirring constantly, bring to a slow boil on top of the stove, letting it slightly thicken. Add the onions and peppers back in. Put the chicken back in the pot - if you're lucky, some of it has now fallen off the bones and is part of the sauce. Serve over rice.