Tuesday, October 30, 2007

Mushrooms. Granola. CRABBIES!

Note: In case you're worried, I did not combine those three ingredients together.
Yet.

It was a busy cooking weekend here at the ranch. OK, I don't live on a ranch, other than in my dreams. But it was still a busy weekend.

Saturday, we had The Clay King over for dinner. A roasted chicken, some twice baked potatoes and sauteed mushrooms - the man does not enjoy vegetables, so I take cooking for him as an excuse to have a mostly unhealthy meal.
Here are the mushrooms - they are the one thing The Professor likes to cook, which means they must be black. Sigh.


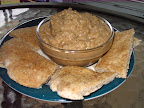
Good times, as we watched both the Red Sox and the Ohio State football team win. The appetizer - a modified version of these crabbies - has been declared a new staple of living by The Professor. I cannot recommend these enough - I made 40 of them and froze half, but The Professor has wanted a few every night. There are only 4 left in the freezer, and I know he'll eat them as a snack tonight when he gets home.


Sunday, I moved on to rye bread, tomato sauce, watermelon rind pickles, and granola. I found a farmer selling about 3 pounds of tomatoes - the last of his crop - for a total of $3.50. As soon as I cut into them, the smell reminded me that I wouldn't have any this good for almost a year. But the tomato sauce is in the canner as we speak, so I can keep the yummy taste around for a bit longer.

The real thing I'm excited about is the granola. I saw this recipe, and couldn't believe it would be this easy. But it was. And holy cow, do breakfasts have a new meaning. I just dump it on some low-fat vanilla yogurt in the morning, maybe stir in some frozen blackberries... and I'm on my way to a healthier me.


I changed a few ingredients around because I do NOT do almonds, and I couldn't find any pumpkin seeds. But that's the beauty of this - you can change it around as much as you like, and it'll still be incredible.

Granola (adapted from Smitten Kitchen)

3 cups old fashioned oats
1 1/2 cups sweetened flaked coconut
1 cup crushed walnuts
1 cup sunflower seeds
1/3 cup packed brown sugar
1/2 cup honey
1/4 cup vegetable oil
1 tsp cinnamon (I LOVE cinnamon)

2 cups dried fruit (Favorite combination: crushed banana chips and dried cherries or cranberries)

Put the rack in the middle of your oven and preheat to 375F.

Mix everything but the dried fruit in a big bowl. Line a large baking sheet with waxed paper (no parchment paper here), and spread the mix evenly. Bake for about 25 minutes, stirring every five. This stuff changes color fast, so keep an eye on it. Make sure to take a deep breath through your nose every time you open the oven, becuase nothing smells like cinnamon.

Transfer to a clean baking sheet, and cool, stirring a couple of times so it doesn't clump up. Stir in dried fruit of choice, and keep in the freezer.

Friday, October 26, 2007

Getting ready for weekend cooking

We're having a friend over for dinner tomorrow night. He is a major carnivore - won't touch anything that looks healthy. And we were originally supposed to be having another good friend - who happens to be vegan - over at the same time. It's always fun cooking for the two of them together. But the vegan's girlfriend had other plans for him, so it looks like it's meat and potatoes tomorrow night. And wine. Lots of wine. Because I'm convinced the reason the Red Sox have won the last two games is because I was drinking wine from my very favorite glasses during the entire game. I'm just giving like that.

  • I'm actually thinking of making these tomorrow. We'll be watching the game after dinner. And I'm sure The Professor will want to pull out something sweet, so I'm going to try Coconut Burfi. And if I'm lucky, no one else will like them so I can have them all to myself.
  • I'm also ready to try something a little healthier for my morning breakfast. I want it to be something I can put together really fast in hte morning, because I do not like to waste precious minutes that could have been spent sleeping. So...I'm going to make my own granola on Sunday. Smitten Kitchen has a really good sounding recipe up. I just have to figure out what dried fruits I want. I have banana chips and dried apples. If I can find some dried pears, I think I'll try those.
  • Finnish Carrot casserole anyone? I'm thinking this would be good to make and take for lunches for a few days. I have never heard of a casserole devoted to carrots, but they are one of my favorite vegetables.
  • And these crabbies...cheese, garlic, onion, crab, bread... I'm in love already. And I may have just talked myself into doing these as an appetizer tomorrow night.

Wednesday, October 24, 2007

Baba Ganoush and Flat bread

Baba Ganoush
Baba Ganoush
Baba Ganoush

It's just fun to say. Go ahead. Say it out loud three or four times. It'll make you feel better. It might also be suspicious activity that will make your loved ones look at you funny – but if you’re like me, you won’t notice because you get that look often.

I don't particularly like hummus, which is because I'm not wild about garbanzo beans. I am over the moon for eggplant though. And baba ganoush is basically hummus made with eggplant instead of chick peas. The eggplant I found this past weekend was predestined to be blogged about. And when I was about to hit "GO!" on the food processor, the jar with one big piece of roasted red pepper in the fridge started yelling at me to be used. So I threw it in the mix.

When I started thinking about making the dip, though, I forgot one important thing: Most people don't just eat this with their fingers. I needed flatbread or something. And I did not feel like going back to the store. Which gave me an excuse to try making homemade pita bread!
I was amazed when I took it out of the oven and it had actual little pockets – like real pita bread! Because, you know, I was so afraid of making artificial pita bread.

Now, I was lucky enough to have tahini in my pantry. I am unlucky enough to have a completely disordered pantry. So when I went hunting for the tahini, my incredibly graceful self knocked over a box of pasta, which pushed over a jar of something, which rolled a wee bit before knocking the tahini off the edge of the shelf.

The lesson I’d like you to learn: Tahini splatters.


Baba Ganoush: (adapted from: http://www.mediterranean-food-recipes.com/babaganoush.html)

  • 2 large eggplants
  • 3 tablespoons lemon juice
  • 2 1/2 heaped tablespoons tahini (sesame paste)
  • 2 cloves garlic – peeled and minced
  • one very large piece of roasted red pepper
  • ¼ teaspoon salt

Pierce the sides of the eggplant with a fork four or five times. Put the eggplants on a baking sheet and put them in a 350F oven for 45 minutes. (The original recipe says to turn them, but…um…I forgot).

Cut the eggplant in half lengthwise and scoop out all the yummy goodness inside into your food processor (yes, I broke down and pulled it out for this). Add the garlic, tahini, lemon juice, peppers and salt. Give it all a whirl until it’s nice and pureed.
Serve with pita bread

Pita Bread: (almost verbatim from here, because it’s perfect as is: http://www.slashfood.com/2006/05/27/homemade-pita-bread/)

  • 2 ½ tsp yeast
  • 1 ½ cups warm water
  • 1 tsp sugar
  • 1 tsp salt
  • 2 cups all purpose flour
  • 2 cups wheat flour
  • Olive oil, as needed

In a large metal bowl, mix yeast, warm water and sugar. Let it proof for about 10 minutes. Add salt and about 3 cups of flour (whatever combination you’d like). Add the remaining flour ¼ cup at a time until the dough forms a ball.

I knead my dough in the bowl – I have a nice wide metal mixing bowl, and it keeps me from getting flour all over the counter, so I don’t have to go hunting for stray particles of flour under my microwave. Knead for about 4-5 minutes, until smooth. Place in a lightly oiled bowl, cover with plastic wrap, and let rise until doubled in size, about 1 hour.

Put your rack in the center of your oven and get your broiler going. Lightly oil a baking sheet.

Punch the dough down and divide it into about 10 pieces (I roughly shaped it into a log and then used a steak knife to cut it into 9 pieces that were about the same size).

Form dough into balls, and cover with a dish towel. Leave to rest for about 10 minutes.
Roll balls into disks that are about 1/8” thick. (I have no clue how thick mine were, but they were probably more like ¼”).

Place 2-3 disks on a baking sheet and broil for about 2 minutes per side. Watch them – as soon as you turn your back, they WILL burn.

Remove from pan and let them cool between kitchen towels (it holds the moisture in). Once cool, store in an airtight container.

Here's a shot of them vey close to finished while baking:


And here's a shot proving that there are actual little bitty pockets deep in there (yeah, it's a horrible picture,but I was so proud of my pockets!):

Monday, October 22, 2007

Oatmeal Cookies - Who says you have to follow the recipe?

The Professor has developed a serious addiction to oatmeal cookies. The cafeteria at his job has them 3-4 times a week, and now he believes that he can’t live without them. The cafeteria’s cookies are surprisingly good. But every once in a while they go too long without serving them, so he comes home and begs me to make some. I love it when he begs.

I took a Betty Crocker recipe and changed it around, since the two of us don’t need 2 dozen cookies. I pretty much just cut everything in half, except for the egg. And since we have old fashioned oatmeal in the house and not the quick cooking stuff, that’s what I use. Which means that the extra liquid from the egg is a good thing. I think. I’m also making these rationalizations up as I go along.

End result: Oatmeal cookies that are a little chewier than usual. And a happy Professor. And that’s all that really matters in my world.

Unless there’s a shoe sale at Belk. Then The Professor’s on his own.

Oatmeal Cookies

¼ cup Splenda
¼ cup packed brown sugar
4 Tbsp butter, softened
1 Tbsp butter flavored Crisco
¼ tsp baking soda
½ tsp cinnamon
½ tsp vanilla
1/8 tsp baking powder
1/8 tsp salt
1 egg
¾ cup old fashioned oats
½ cup all purpose flour
½ cup raisins

Preheat oven to 350F
Mix all ingredients except oats, flour and raisins until thoroughly blended.
Add flour and oats, and mix thoroughly.
Stir in raisins.
Drop by rounded teaspoons onto ungreased cookie sheet.
Bake about 9 or 10 minutes – they will burn quickly, so watch out!
Cool on wire racks if you can wait, or just eat straight out of the oven.
Yield: 12-15 cookies

Adapted from Betty Crocker’s Cookie Jar Cookbook

Sunday, October 21, 2007

Polenta = Halloween?

Weekend Cookbook Challenge chose Halloween as this month’s theme. I had promised myself I would participate this time…but I am not much of a creative thinker. And I don't have a cake mold in the shape of a pumpkin, a witch or any other Halloween-y thing. I do have cats, but neither one is black. And I probably wouldn't cook them anyway. Unless they transform ANOTHER throw into rags. But I digress.

I couldn't think of a good Halloween food. Other than Milky Way bars. But I am NOT up to making those from scratch.

So here's about a 1 minute stream of consciousness on how I solved this dilemma:

I sat down with a cookbook that I've never opened.
I saw a recipe for Polenta.
I've never made Polenta.
I bet Polenta would be good.
Polenta's made from cornmeal
Cornmeal comes from corn.
Corn is a fall food.
Halloween's in the fall.
I'll make Polenta!

Cornmeal comes from corn? My genius knows no bounds.

Crispy Polenta with Mushrooms, from Cooking for Two by Bruce Weinstein & Mark Scarbrough

1 1/2 tsp unsalted butter at room temperature, plus additional for buttering the pan
1 1/2 cups water
1/2 cup coarse yellow cornmeal
2 Tbsp freshly grated Parmigiano-Reggiano
1/2 tsp salt
2 Tbsp olive oil
1 small onion, thinly sliced
8 ounces cremini or white button mushrooms, cleaned and thinly sliced
6 Tbsp dry vermouth
1 Tbsp tomato paste
1/4 tsp dried thyme
1/4 tsp dried chopped rosemary
1/4 tsp freshly ground black pepper


  1. 1.) Butter a 1 quart round soufflé dish; set aside. I don't own a souffle dish, so I used my corningware – the point is to let the polenta set in something round.

  2. 2.) Bring the water to a boil in a medium saucepan over high heat. Stir in 1 Tbsp of the cornmeal with a wooden spoon, then immediately reduce the heat to low. Continue adding tablespoonfuls of the cornmeal, stirring each in before adding the next. Once all the cornmeal has been added, reduce the heat to very low and continue cooking for about 15 minutes, stirring constantly, until the polenta begins to leave a film on the bottom and sides of the saucepan. In these small quantities, polenta can scorch, so keep the flame heat low and stir constantly.

  3. Stir in 1 1/2 tsp butter, the cheese, and 1/4 tsp of the salt. Pour the hot polenta mixture into the prepared dish. Set aside to cool and firm up for at least 30 minutes while you prepare the mushrooms. Heat a medium skillet or sauté pan over medium heat. Swirl in 1 Tbsp of the olive oil, then add the onion. Cook for 3 minutes, or until golden, stirring frequently. Add the mushrooms and continue cooking for about 5 minutes, or until they release their liquid and it is nearly evaporated, stirring constantly.

  4. Add the vermouth, tomato paste, thyme and rosemary; bring the mixture to a simmer. Cover, reduce the heat to low, and simmer for 15 minutes, or until thickened like a sauce. Stir in the remaining 1/4 tsp of salt and the pepper. Set aside off the heat, covered to keep warm.
  5. Run a knife around the sides of the polenta to release it from the casserole dish. Turn the
    polenta out onto your work surface and cut it, like a pie, into 6 even wedges. Heat the remaining 1 Tbsp olive oil in a medium skillet or sauté pan set over medium heat. When the oil begins to smoke, carefully add the polenta wedge. Fry for about 4 minutes, or until lightly browned and crisp, turning once.

  6. To serve, divide the wedges between two plates. Spoon the mushroom sauce around and over them. Serve immediately.

Saturday, October 20, 2007

Weekend Shopping

Last weekend, my aunt gave me a $25 gift certificate to Bed, Bath and Beyond. And of course, now that I get to go spend money there, I can't find any of those 20% off fliers they put in my mailbox three times a week. But I'm finally getting a new pepper mill! And a new shower curtain! And I think I'll have about $5 left after that, so I'll go see what kind of kitchen type gadgetry I can find to spend money on. I love shopping for my kitchen.

  • Being part of the Deep South, this was really interesting. Why is Moonshine Still Illegal? I'm all for being able to make my own liquor. Alabama has some crazy laws about this kind of thing, though.
  • Meathenge did brisket. The pictures make me want to kidnap him and force him to cook this three times a week. Because then I'd apparently get to eat all that meat. I'm not sure how The Professor would feel about that, though. I think I'll just have to lust after the Biggle Brisket from afar.
  • I'm declaring Pumpkin Bread Pudding the most perfect sounding bread pudding EVER. Even better than the eggnog bread pudding I fell in love with last year. I am officially in love with all things pumpkin.
  • Hunt the Recipe has convinced me that the time in my life has come when I must try parsnips. I've never eaten or cooked with them, but they're on my afternoon shopping list so I can make a Fall Vegetable Pasta Bake.

Wednesday, October 17, 2007

OH NO! Green Tomato Salsa

Last week, I was all excited about my tomato plants being reborn. Then I found the scourge that is the tomato hornworm running a refugee camp in my plants. So I hurriedly harvested the green tomatoes, because I certainly wasn't going to let the dratted worms have all the fun. If they can eat my underripe fruit, then by golly so can I.

The only problem is...I have never made anything with green tomatoes. I've eaten fried green tomatoes. I've even watched part of the movie on TV. But I wasn't sure about breading and deep frying sliced roma tomatoes. Very small, immature roma tomatoes. And my hazy memories of the movie provided no inspiration at all

So I poked around the internets, and found some salsa recipes that I liked. And then, I promptly ignored the basket of green tomatoes and itty bitty onions (that I forgot I planted and found growing around my tomatoes) for about 4 days.


That was until I made the chicken stuff a couple of days ago. As I was cleaning up the kitchen, I kept looking at that basket. And then I saw the bowl that had held the paprika'd onion and bell pepper, and it has a little paprika residue all around the inside. And then I looked back at the tomatoes and peppers. And then, finally growing tired of my obtuseness, my Kitchen Muse knocked me on the side of my head with my iron skillet and roared "ROAST THE TOMATOES IN THAT BOWL, DIMWIT".

Being smart enough to listen to my muse when she starts throwing around my heavy kitchen implements, I promptly washed the cutting board and started cutting things in happy abandon.

Roasted Green Tomato Salsa

20ish small green Roma tomatoes, halved
10 very tiny white onions (or 1 medium), chopped
2 Tbsp olive oil
1 tsp paprika
1 tsp cumin
1/2 tsp ground red pepper
1/2 tsp ground chipotle pepper

*note - The Professor does NOT like spicy things, and I do. So I always start off pretty mild and then divide the salsa, spicing up my portion afterwards.

Preheat oven to 250F.

Put tomatoes and onions in an oven-safe bowl. In a separate bowl, mix olive oil, cumin, chiptle and red peppers. Pour over the tomatoes and onions, and stir to coat. Put in the oven, uncovered, for about an hour or until the tomato skins are shriveling. I love the taste of shrivelled tomato skins. mmm....where was I ?

Remove from the oven, and set to work with your potato masher. Or, if you like using your food processor, do that. I just hate to clean the damn thing. But I ended up getting it out because The Professor likes smooth salsas. Taste as you mash, and add more spices as you like. The Professor's portion of this was perfect for him, but I added another dash of each the red and chipotle peppers.

This salsa was completely unplanned, and since I was too lazy to go to the store and spend the $1 on fresh peppers, I just used what I had in my spice cabinet. But I'm going to try this next year, when I will hopefully have a little more motivation to use real peppers.

Tuesday, October 16, 2007

Chicken Paprikash. Kinda. Sorta. But not really.

I have a sneaking suspicion that when an actual chef goes into the kitchen to make a dish like, oh, say Chicken Paprikash, that:

A) He/She cuts the chicken up into beautiful, symmetrical pieces; OR
B) He/She doesn't accidentally throw the onions - that he/she just cried over while cutting - into the garbage bowl on the counter; OR
C) He/She doesn't forget to buy the damn sour cream; OR
D) He/She doesn't open the spice cabinet to find out that he/she doesn't really have enough paprika left to make what the damned dish is named after; OR

E) ALL OF THE ABOVE.

It's been a roller coaster of a week the past few days. Great family gathering. Disaster of an apple pie. Awesome Coconut Cream Dessert type thing. Major car repair bill.

So when I found a 3.76 pound chicken in the meat section of the grocery store marked down to less than $2, I decided it was time for a good, old-fashioned comforting type of chicken dinner. A whole chicken. Roasted? Cooked slow, definitely. Not too many ingredients. Easy, but filling.

And Chicken Paprikash was slow cooking, short on ingredients, easy and filling. But....well, see A through E above for what I didn't bargain for getting with this dish.

It ended up as a scrumpdidlyumptious meal, though, served over rice. With a very large glass of wine. For comfort. Not to mention for my mental state after balancing the checkbook with the car repairs thrown in.

Kinda Sorta Chicken Paprikash

3 1/2 pound whole chicken, cut into pieces (I froze the back and wings for stock)
  • 3 Tbsp vegetable oil

  • 2 white onions, chopped kinda big

  • 1 red bell pepper, chopped kinda big

  • 2 cloves of garlic, minced

  • 1 cup chicken stock

  • 1 Tbsp paprika

  • 2 tsp pepper

  • dash of salt

  • 1/2 cup half and half


Brown the chicken thighs and breasts in a large oven proof pot. If your pots not ovenproof, you'll just have one more dish to clean later, because you'll have to find something to use in the oven.


Remove chicken from your pot, and set aside. Add the onions, bell pepper and garlic, and sautee for about 4 minutes. Remove these from the pot too. Pour the chicken broth in the pot, and - if you haven't already picked them out and eaten them (not that I would do that) scrape up all the yummy brown things from the bottom of the pan. Add the paprika, salt and pepper and give it a good stir. Pour the flavored broth over the onions and peppers. Put the chicken back in the skillet, and pour the broth, onions and peppers over the chicken. At this point, it didn't look like I had enough liquid - I wanted a lot of sauce later - so I poured another 1/2 cup of chicken broth over the whole she-bang. Put in a 300 degree oven for about an hour, making sure the chicken is thoroughly cooked before you remove it.


Take the chicken out of the pan, and strain out most of the onions and peppers, leaving the brothy heavenliness in the pan. If I had more paprika, I would have added it here. Add the half and half to the broth and stirring constantly, bring to a slow boil on top of the stove, letting it slightly thicken. Add the onions and peppers back in. Put the chicken back in the pot - if you're lucky, some of it has now fallen off the bones and is part of the sauce. Serve over rice.

Monday, October 15, 2007

Coconut-y Cream-y Pie Type Thing-y

The Phantom of the Opera was in town this weekend, and even though only three of us went to see it, at one point there were over 20 of us in my sister's house for dinner. The large number is helped by the fact that all ten of my nieces and nephews were there. The weekend was loud. It was boisterous. It was also full of food, fun and the kind of happiness that only comes from spending large amounts of time with a loud and boisterous family.

Since my house isn't large enough to hold more than about 4.75 people and two cats, the family dinners are at my sister's house. But I get to make the desserts. And with this many people, I get to make more than one. The hard part is deciding what to make. I can spend weeks pouring over recipes. I made an apple pie for one night- but I didn't buy enough apples, and I baked it too long. I brought it anyway, to keep me humble. The next night, though, I brought two desserts - a coconut cream pie and a blackberry chiffon.

I'm still on the fence about the blackberry chiffon. It was a lot of work (I wanted it to be seedless), and it didn't have the incredible blackberry taste I was going for. The coconut cream "thing", however, was worth every ounce of effort. Plus a few ounces that I didn't use. It wasn't really a pie - there were so many of us, that I doubled my recipe and made it in a 13x9 pan. And since the pie was mostly made for my mom - who loves coconut and views meringue as a waste of time - and since I don't really enjoy making meringue, I usually do this without all the fru-fru on top.
This pie takes a lot of wrist action. But it is worth every bit of it. It's a great recipe to get those whisking muscles into shape. It seems like every step takes twice as long as you think it will, because you just keep whisking, and whisking, and whisking...

Coconut Cream Pie
Crust:
3 cups graham cracker crumbs
1/2 cup Splenda
1 stick of butter, melted

Filling
1 cup Splenda
1/2 cup granulated sugar
1/2 cup cornstarch
1/2 teaspoon salt
1 14 oz can unsweetened coconut milk
3 cups whole milk
8 egg yolks
1 stick butter, cut into pieces
1 Tbsp vanilla extract
2 cups sweetened shredded coconut, toasted and divided

Mix crust ingredients and spread in a 13x9 pan. Bake at 350 F for 10 minutes.

Mix Splenda, sugar, cornstarch and salt in a large sauce pan. Add the coconut milk and whisk together until it's smooth. Slowly pour in the whole milk, whisking the entire time. Put over medium heat and whisk constantly until it's slowly boiling. This will take almost as long as it takes to read War and Peace. Remove the pan from the heat.

In a separate bowl, whisk the egg yolks until they're golden and smooth. Whisk about a cup of the coconut mixture into the yolks, and then add the yolk mixture to the remaining coconut in the pan. Turn the heat back up to medium, and whisk constantly until it's slowly boiling again. Continue whisking and boiling until it's getting a little thick, about 2 or 3 minutes.
Remove from the heat, and use a spatula to scrape the bottom of the pan. Add the butter pieces and whisk some more until the butter is melted and everything is smooth. Add the vanilla and 2 cups of the toasted coconut, and whisk some more until it's ... well whisked.

Pour the filling on top of the graham cracker crust and smooth a piece of plastic wrap directly on the surface. Refrigerate until it's set, about 5 hours or overnight.

Before serving, remove the plastic wrap and sprinkle the remaining toasted coconut over the top. Devour on it's own, or be really decadent and spoon some whipped cream on top.

Saturday, October 13, 2007

Fall recipes. And Craving lasagna.

I've been so busy baking desserts for the balooning family gathering this weekend, that I haven't actually cooked anything in days. Well, I guess I should say I was so busy looking at recipes. Because I only ended up baking three desserts, but narrowing the list down took the better part of three days and two bottles of wine. Thank you, Internet.

  • Smitten Kitchen has posted what just may be the best looking fall recipe of all time. Butternut squash and caramelized onion galette. The name is long but the taste is strong. And I think I should get paid for coming up with that slogan.
  • Last Night's Dinner has had some even more amazing recipes than usual this week - I need someone to cook like that for MY birthday. The "Keep it Simple" meal is making my mouth water at 10 AM after a full breakfast. And if THAT's not the mark of good food, then I don't know what it.
  • It must be fall, because butternut squash is ALL OVER the internet these days. Roasted Butternut Squash Soup from Tasting Spoons makes me remember that it's been almost a year since I've made it. And as soon as I get the visions of tonight's lasagna out of my head, then I'll get right to it.

Tuesday, October 9, 2007

No Nuts in My Bread, Please

Banana bread is one of my favorite comfort foods. When I was a kid, the whole family got excited when my mom made it. I never understood their devotion to covering a slice with cream cheese, though. I prefer mine warm with a little butter melted into it. Or just a chunk straight out of the oven. Or if I'm home alone while I'm mixing it up, I may or may not be prone to scooping out a huge spoonful of pure batter bliss. This, of course, is just to taste it to make sure that, there's .. um...enough cinnamon in it. Yeah. Because I would NEVER subject The Professor to under-cinnamon-ized banana bread.

And I need to go ahead and apologize to the best friend - because she has a deep love of banana bread, and she's been known to purchase bananas with the sole purpose of letting them get over ripe and then handing them to me with a maniacal gleam in her eye. And I don't think she's going to get any of this.

Although I love pecans and walnuts, I've never really liked them in breads and brownies. It's just one of the little quirks that makes me a little more crazy unique.
I also made this with soy milk, since we don't usually have regular milk in the house, and Splenda. The bread cooked a little faster than usual, and since I've never made it with soy milk before, I'm going to assume that's the reason. Although I'm just talking off the top of my head and have no idea if that's accurate.


Banana-Cinnamon Bread That Is Not Cluttered Up With Nuts

Ingredients
1/4 cup butter, softened
3/4 Splenda
2 medium bananas, mashed
1/4 cup soy milk
2 eggs, beaten
1 tsp vanilla
1 1/4 cup flour
1/2 tsp baking soda
1/4 tsp salt
1 tsp cinnamon


Preheat oven to 350 degrees and re-arrange your racks so that the pan will be in the center of the oven.
Grease one 8 inch loaf pan or three mini-loaf pans.

Beat butter and Splenda together until creamy. Add the bananas, soy milk, eggs and vanilla and mix until everything's combined. Sift Flour, baking soda, salt and cinnamon together. Add to the banana mixture and mix it up. Taste a heaping spoonful to make sure you've put enough cinnamon in it. You probably haven't, though, so if you're afraid of salmonella poisoning, just go ahead and dust the top of the batter with more cinnamon and mix it up again.

Pour into greased pan (and if you're a real cinnamon freak like, uh, me then sprinkle a little more on top) and bake for about 40 minutes.
Put pan on wire rack for ten minutes, then remove from pan and place loaf on wire rack to cool completely. Or start breaking off chunks of it and devour immediatly. Really, at this point, you can't go wrong.

I don't like my banana bread to be baked all the way through - I love it to be a little bit underdone in the center.

Even more than that, though, I LOVE the way the house smells while this bakes.

Monday, October 8, 2007

Onions on sale, otherwise known as a really good excuse to make soup

Ahhh, Sundays. A day of endless possibilities. And it's almost the time of year - almost cool enough to actually be called "Fall" - when spending hours in the kitchen sounds like a joy. For the last five months, spending hours at a time in my small kitchen with a hot oven and a pot of something bubbling on the stove sounded more like some kind of terrorist torture method than a soothing, relaxing activity. There's a reason that iced tea and lemonade reign supreme here in the Deep South.

But it's not that time of year quite yet. So I had to find something that would fill the growing need to cook something in the middle of the day that is more complex than a grilled cheese sandwich without becoming a drooping, humid mass of frustration. I went to the store and wandered around the produce section, searching for inspiration, when I found a sale that made my heart go pitter-patter:
Sweet onions, 3lb bags, BUY ONE GET ONE FREE.


Ladies and Gentlemen, there are few things in this life that make me happier than the B1G1F sales at Publix. As soon as I saw the mounds of onions glistening there in front of me, I knew what I wanted to cook. And I planned on making enough to freeze some for later in the year, when I'm rushed with holiday shopping but still want something warm and soothing. In fact, I need something soothing right now - I just missed out on not one, but THREE great deals on Amazon because I waited a day too long to hit that purchase button.
Pass those croutons, STAT.


The Simplest French Onion Soup EVER


Ingredients:


1 stick butter
2 pounds sweet onions, sliced thin
a few healthy pinches of Kosher salt
6 cups Beef stock, chilled and defatted
2 cups white wine (optional)
1 tsp dried thyme
Big Fat Crusty French Bread Croutons (See below)
A Heap of Grated Cheese (I'm not going to be picky and tell you what kind, but I used Mozzarella this time)


Preparation:


In a stock pot or other large pot, melt the butter on medium-low heat and add the onions and a quick pinch or two of salt. Swirl the onions around to get them nice and coated with buttery goodness, then leave them alone for about 10 minutes. Walk away to somewhere cool and comfortable. Then you can come back and stir them around occasionally, cooking for another 20 minutes or so. You're waiting for them to let out all their onioniy love juice and carmelize;
they'll dramatically reduce in size.


Once your onions are ready, add the wine, the beef stock, the thyme and a dash or two of pepper. Or if you, like me, think of pepper as the best thing to happen to food since fire, then put in a bunch more. Then give everything a big stir, cover the pot, put the heat on low and walk away for at least 45 minutes. I let this batch bubble and brew for a little more than an hour while I sat outside in the shade with a beer and a book.


When you're ready to eat, ladle the soup into your bowls, throw a few good sized croutons on top and top with the shredded cheese. Put the whole she-bang under the broiler until the cheese is melted, bubbly and starting to brown.
Now, you have two options:
A.) Horde it and don't tell anyone in the house that it's ready, or
B) Build up some good karma and share your creation.


Note: I really really prefer this soup with fresh grated Romano cheese melted on top. But in my soupy-dream-filled delirium at the grocery store, I forgot to pick some up. So I used the whole milk Mozzarella that I had at home. And you know what? It was still yummy.


Big Fat Crusty French Bread Croutons
I've never measured anything for my croutons, but here's how I do it:


Preheat the oven to 400 degrees.
cut about half a loaf of french bread into good size chunks, about 2" - cubes;
Melt a stick of butter. Add a few shakes of garlic powder and onion powder, plenty of fresh cracked black pepper, a few shakes of celery salt and a good dose of Italian Seasoning.


Gently toss the bread with the butter mixture and spread the cubes on a greased baking sheet. Bake for about ten minutes, turning half way through.

Ok, so I'm not a master gardener. Or even a good novice.

I had a lovely crop of Roma tomatoes and yellow squash this year. Both of them went absolutely nuts, which made feel a little bit less like "you have no business gardening, you lazy slug" and a little bit more like Martha Stewart. I thought I made more tomato sauce and salsa this summer than we could ever eat. But there's none left.

For a couple of weeks, I've been meaning to go out and pull up the dead plants, put some compost down and clean everything up for its long winter nap. Which isn't so long here in the Deep South, but a nap is a nap - There's no such thing as a bad one. And now I'm putting myself to sleep.

Well, I looked out at my supposedly dead tomato plants - they just couldn't take the massive heat wave, and gave up all attempts around the TWELFTH straight day of 100+ degree heat we had in August - anyway, I look out and my tomato plants have flowers and tomatoes all over them! I have an entire new crop of tomatoes growing!


So I raced outside with my gardening soul singing songs of joy and dreaming dreams of more red sauce. And maybe this time I would practice some self-control and freeze some for the winter. But first I really figred I should get rid of all the dead stuff. The squash vines were dead, so I pulled them up. And then I started working on the dead leaves and vines in the middle of the tomato plants. And I reached in and came face to face with a caterpillar. A very green caterpillar. Which kind of worried me, because now I knew why the leaves were half eaten on that little section. And then as I reached to grab a dead leaf, I saw this on the back of another one:


From What's In My ...


I didn't know what it was, but I was pretty sure that when unidentified caterpillars - that have been eating my plants - take up their long winter nap on the back of my leaves, it's only because of the proximity to the food source. And the last thing I want is a breeding mass of these critters.

So I frantically ran inside, looked up the information and discovered I have tomato hornworms. Or at least that's what think I have. And to prove that a Freddy Kreuger nightmare was in the making in my little plot of dirt, I found out that they may or may not have laid their eggs in the dirt around the plants. So I have to get rid of my tomato plants, and my dreams of chunky, garlicy, yummy red sauce have now disappeared. But I DID harvest the green tomatoes that were there. Now I just have to figure out what to do with them. (That's me begging for ideas, y'all).

On a happier note, the bell pepper plants that produced the bountiful harvest of ONE RED PEPPER this summer have now decided to go crazy as well. I have about 5 peppers growing; three of them are about 5 inches long. Now I just have to be patient and let them turn red before I rip them off the plants and devour them.
From Untitled Album

Saturday, October 6, 2007

Fettuccine e Verdure

I was so busy thinking about the wonderful grilled chicken that I had planned for dinner tonight, that I forgot to plan what I would serve with it. The Professor likes chicken just as much as the next guy, but if I simply gave him a plate full of meat and went on my way, he would probably take me to a shrink. So I had to come up with something fairly quickly. In my world, that means randomly pulling things out of the refrigerator or pantry and throwing them in one big bowl and giving it a fancy name. Somehow, I have convinced the Professor that this is an actual talent, rather than desperation.

This was the pasta of choice. When he asked, I told him it's called Fettuccine e verdure.

Somehow Fettuccine and vegetables sounds much more like an actual planned dish when you say it in Italian.

The fresh basil and Parmesan cheese were the stars of this dish. Everything else was just there to give them something to cling to. Although a plate of Parmesan cheese and basil sounds pretty good, now that I think about it...


Ingredients:
8 ounces Fettuccine
2 cloves of garlic, finely chopped
1 green bell pepper, cut in decent size chunks
1 white onion, cut in decent size chunks
1 pound button mushrooms, cut in decent size chunks (our mushrooms were HUGE, so I quartered most of them)
olive oil
one stick of butter, divided
1/2 cup grated Parmesan cheese
1/4 cup half and half
about 6 or 7 fresh basil leaves, chopped

Preparation:
start cooking your pasta.

Slowly heat the olive oil and garlic in a skillet without really sauteing, so the garlic infuses the oil.
Add the onions and peppers and saute them for five minutes. Add the mushrooms and - here's the really yummy part - add several tablespoons of butter. The mushrooms will absorb that like drunks on a 3 day binge.

Drain your pasta and return it to your pan. I added about 3 tablespoons of butter and a half a cup of Parmesan cheese. Then on a whim, I grabbed the half and half out of the fridge and splashed about 1/4 cup in the pasta. Once the butter is melted, add your sauteed vegetables and your chopped basil and stir it all together.


As a side note - some of the onion stuck to the saute pan, and apparently continued to cook while I stirred my pasta-ness together. Those five or six little pieces got brown and crispy, and had such an incredible taste. Maybe next time I'll saute the onions separately so that they can really caramelize.

Thursday, October 4, 2007

So many recipes, so little time

There are sooo many good looking recipes out there. So many blogs that make the food look so good, I'm almost scared to post pictures of my stuff. But I figure if nothing else, my own food photography will keep me humble. So I go on. Purely for the sake of keeping my vanity in check, you understand.

And purely for the sake of keeping my waist line in check, here are some recipes that I did not immediatly make upon reading. They are now in the "To be made" list, but in order to keep the treadmill torture from being completely counteracted, I won't let myself spend the weekend making every last one of them. Maybe all but one, but not every last one. So if you make one, tell me how awesome it is, so I have justification to make it myself.
  • Bloomin Sourdough - oh my. I almost had to have a private moment when I saw this. My resolve is slowly crumbling - but that's ok, I have family coming in town soon, and I plan on wowing them with this.
  • Smoked Scallops with Zucchini Ribbons - This is almost enough to bring tears. Scallops? Smoked? With zucchini ribbons? It's a good thing there are some scallops in my future.
  • SAUTÉED OKRA & GARLIC - I have never cooked with okra. And outside of the slimy mass inside the fried things that are all over the deep south and the occassional bowl of faux-gumbo that can be found in the same places, I've bever had it. So I have to try this. For educational purposes.
  • Pan Seared Filet Mignon with Wine-Shallot Sauce - I'm afraid this will be on the dream list for a bit. My budget has no room for filet mignon. But looking at that picture of a perfectly cooked steak...resistance may be futile.

Monday, October 1, 2007

Veal a la Barone

Yes, the name is completely my invention. One time when my in-laws came for a visit, I looked around for a few veal recipes, trying to decide how I wanted to cook my veal. Of course, I found 20 that I liked (the main criteria for me to approve was for it to require A.) Veal and B.) some type of wine). In the end, when it was time to cook, I just cooked on my own. I briefly thought about looking up one of them, but then forgot about it by the time I was finished drinking the first glass of wine chopping the onions. So I tried to remember what I did, cause it was yummy. It very well might be extremely similar to something that has a real name. But don’t tell me. Let me believe I’m original. (If you want specific amounts, you’re out of luck, but you can look through the recipe and see what I put down. Welcome to my ADD way of cooking.)

You’ll need:
veal cutlets (we had 7)
bread crumbs
olive oil
a couple of egg whites
pearl onions
shallots
fresh garlic
fresh sliced mushrooms (I got a package of the gourmet mix from Publix with Baby Bella, Shiitake and Oyster mushrooms)
Your choice of wine (I had also intended on making a Marsala sauce, but couldn’t find any Marsala. Or Madeira for a Madeira sauce. So I used the open bottle of Sangiovese from our local winery).
chicken broth
cornstarch
salt and pepper to taste.
And whatever other seasonings you like.

Heat a couple of tablespoons of olive oil in large skillet.Dip veal cutlets in beaten egg white, then bread crumbs. When oil is sizzling, put the veal in the pan.Cook for about 3 minutes on the 1st side, and 2 or 3 minutes on the second side (you may have to add another tablespoon of oil).
While the veal is cooking, finely chop 5 or 6 pearl onions and 2 or 3 shallots. When the veal is finished, remove it from pan (leave the oil) and place on paper towels to absorb excess oil. Put veal on cookie sheet and put in a very low temp oven while you cook the sauce. It’ll get nice and crispy.

Put chopped onions and shallots in remaining oil in pan, and press fresh garlic into pan as well. Crack fresh pepper to taste into skillet. Sauté-until well cooked (about 5 or 6 minutes, longer if you added fresh oil after veal). Dissolve 2 tablespoons corn starch in ¼ cup of wine, and set aside.Pour ½ to 1 cup of wine and 2 cups of chicken broth into skillet. Add the mushrooms. When mushrooms are cooked as much as you like (about 5 minutes if you’ve got thick slices), add the cornstarch and wine mixture, stirring constantly. Cook until the gravy is the consistency you like. Place Veal on serving platter and either pour the gravy over the top or serve on the side. Eat with a really good red wine. We had another bottle of Sangiovese with it, then opened a Valpolicella.